
The context behind this post is that I have been blogging for several years and have previously posted about Why I blog and why you should too, and I personally believe that blogging is definitely worthwhile not only for career progression but also for personal fulfilment too. Having the ability to share your thoughts and have them validated, critiqued and commented on by peers in your field is truly rewarding. It is also a valuable tool to keep yourself motivated to continue developing, learning and enhancing your skill set.
Many people think of a blog as some kind of get rich quick scheme or just purely as a means to make money or as many people like many to call passive income. generation. However, although those certainly those objectives may be possible and certainly there are many examples of people who have done just exactly that. It's not always that easy and truth be told it does take a load of work along with learning a whole raft of skills.
Passive income is a source of income that requires minimal effort to achieve. Income from a rental property, investments on the stock market, and participating in affiliate marketing are all examples of passive income opportunities.
I'd have to confess, that at the start of my journey with blogging, this was probably one of my driving objectives, but in all honesty I have never been that successful at generating real passive income because a lot of the income generated did require a significant amount of effort. I have and continue to manage to generate money from my blog, but not in the scales of millions and not really at all passive income by the terms of the definition, because my blog has turned out to be a great source of leads, employment and freelance opportunities which have all contributed to me generate revenue high into the six figures.
When I started blogging, WordPress was the undisputed king of blogging platforms and possibly could still be. WordPress is a great platform, but If I'm brutally honest it does come with a healthy learning curve and maintenance burden, it can also be a minor cost burden. I spend in the region of about $600 a year on hosting and various plugins maintaining my blog a year. For the most past this cost is covered by various affiliate schemes and other forms of revenue and I have managed to build a small business from it.
Having the ability to create a new blog, has become a whole lot easier over the interim period, and in many ways anybody interested in setting up a blog can be spoilt by choice. In this post, I will walk-through the process of creating a new blog using Nuxt 3 and hosting it on Netlify.
Soft Skills
The software developer's life manual
A guide to a well-rounded, satisfying life as a technology professional.
Prequisites
In order to following along with this guide you'll need the following
- A domain name, I recommend using NameCheap to purchase your domain name, you can Get a .COM for just $6.98!
- Have a basic understanding of Nuxt 3, a good place to start to learn would be Getting Started with Nuxt3
- Some understanding of the understanding Nuxt 3 minimal project structure
- An account with Netlify
- A Github Account
Set Up
This tutorial for the most part can be followed along with using any operating system, but I am a Linux based developer, therefore the instructions are mostly Linux based. Check out Why I use Linux as my developer platform if you're interested in learning more about using Linux as your preferred development OS.
Buy a Domain Name
The ultimate goal of this walk-through guide is to provide you with a complete guide to building and managing your own Software Developer Blog, that you can use to enhance your profile and career opportunities, help share skills across the software development community and so much more.
Probably the first step, on this adventure is to decide on a Domain Name to buy. You could spend hours days and weeks deciding on the perfect name. However, bear in mind that one of the hardest things in Software Development is naming things, so you can just short circuit this and just use the name that your parents already decided on, which is the approach I took for my blog and just used my full name.
This approach has worked well for me, and honestly I would recommend it for anyone thinking of going on the same journey. Honestly, as time goes on will probably develop a number of additional websites in your career and you will undoubtedly think of a whole lot of domain names to purchase. However, its important to bare in mind that your blog and profile is essentially about showcasing your skills, personality and you as a person so you might as well use your name.
I recommend using NameCheap to buy your domain name, I tend to use them for most of my Domain Name purchases and have found them to be reliable, efficient and economical. You can get a .COM for just $6.98!, but don't worry if your name combination is already taken on .com NameCheap offer a number of Top Level Domain (TLD) extensions so you'll be able to find your choice.
When I started blogging, and registered my account it was considered at the time that .com address was the best option, but honestly I don't think it really matters that much these days. I've developed a number of successful websites for clients using a myriad of different TLD's .
In most cases, people are going to find your website via a Search Engine and 9/10 they won't even look at the domain name, they're only interested in the content and ultimately this is what matters.
With NameCheap you can get a .blog , .website , .net, .tech or literally any type of TLD, so just choose one you feel is best and get on with it.
Create a GitHub account and Profile
In How to create a GitHub Profile Page I discuss the reasons why you should have a GitHub Profile and how build your profile page and even how to customise it. Having a GitHub profile not only provides several advantages to your career as software developer, and Open Source Project contributor but it also helps you to to provide links and exposure to your blog, which as we'll discuss later in this post is really important.
The goal of this guide is to provide you with you with all the information you need to have your own blog to show case your development skills and build a portfolio. However, along the way we will also learn how to host your blog on Netlify, and also learn how to build a fully functional CI/CD pipeline enabling you to maintain, manage, edit and enhance your blog just by making updates via your GitHub repository. Therefore pretty central to this is the need to have a GitHub repository for your source code.
Create a new project with Nuxt 3
In getting stared with Nuxt 3 and understanding Nuxt 3 minimal project structure I discussed the introductory aspects of Nuxt 3 and walk-through the basics of how to create a project with Nuxt 3. If you don't know how to start a new project with Nuxt 3, I recommend going through those posts to understand the basics.
I suggest you create a GitHub Repository first using the approach defined in How to install the GitHub CLI , which if you're following along with this guide you're probably already familiar with because you've already used it in the previous section.
If you've already created your Git Repository and want to create you project in the folder you're in you can simply use the --force flag of the nuxi tool to create your project.
nuxi init . --force
How to use Layouts in Nuxt 3
Nuxt 3 is a great framework to use to quickly create new applications, primarily because it has great features that help to extend and use features with in Vue 3.
In Nuxt 3 Layouts are defined as Vue.js components and are stored in the layouts directory of your Nuxt.js project. You can define as many layouts as you need, and each layout can be customized to meet the specific needs of your application.
In how to use layouts in Nuxt 3 I walk you through the process of implementing and using layouts in Nuxt 3.
How to add Tailwind CSS to Nuxt 3
In how to use modules in Nuxt 3 we configured our Nuxt project to make use of Tailwind CSS to simplify the styling of our application, we will use the same configuration for this project, so go ahead and do the same for this project.
Using Tailwind CSS will dramatically simplify your UI design work, I tend to use Tailwind UI Components for most of my quickstarts then gradually evolve my designs
Alternatively, if you want to make use of a more of Material UI component approach I recommend using MDBootstrap, I have previously discussed How to start a new project using Vue.js , I will be writing a detailed guide to integrate this library into Nuxt 3 in the future.
How to use the Nuxt content module
Nuxt 3 has a rich Module and Plugin library with a number of options enabling you to extend and enhance the functionality of Nuxt 3.
In How to use the Nuxt 3 Content Module a provide a detailed walk-through on how to install and start using the Nuxt 3 content module.
Writing content for your blog is one of the key activities and I find writing content in Mark Down to be the easiest and most importantly distraction free experiences. Markdown is by far, in my experience anyway, the best way to write content. This mixed together with the Nuxt 3 Content Module is just makes the whole process easier to render on your blog.
There is no need to set up a database or anything like that the MarkDown files are just stored in the content folder of your Nuxt App and they are used by the Nuxt Content Module. This way, you can publish new posts just by commit new files to your Content folder.
How to Add Web Analytics to Nuxt 3
If we bare in mind that one of the objectives of developing and managing your own professional developer blog is that you get the opportunity to develop, enhance and show case a number of your soft skills as a developer, soft skills such as:
- Communication
- Adaptability
- Organisational
- Creativity
- Openness to criticism
- Resourcefulness
- Strategy
The other benefit is that you get to explore and gain some firsthand exposure to a whole raft of other hard skills, such as;
- Digital Marketing
- Graphic Design
- UI/UX
- Search Engine Optimisation (SEO)
- Content Marketing
- Course Creation
- Product Management
The benefit of having an understanding and proof of implementation of these skills has had a profound impact on my career as a software developer, it has also enabled me to contribute to a vast array of products over time.
Some key skills to learn early on when setting up your blog are SEO & Digital Marketing. Its important to remember that you're not expecting to become an expert in these fields, because they are continually evolving but you want to learn the basics and focus on the elements that are important for your needs.
I'm no expert in SEO and I'm sure I still make mistakes and there are probably a lot of things I could do to improve the SEO performance of my sites. However, the most important thing is that a number of my blog posts rank really high in search results for specific key phrases, with some being in the number 1 spot.
These results didn't come by accident, but because I took the time to learn some of the basics of SEO and surprisingly I learned most of what I know from a For Dummies book. Despite, the fact many of the reviews I read on the book supposedly telling me that a lot of the stuff was out of date etc., based on my experience this definitely isn't the case, the basics covered in this book are still highly relevant today, primarily because Peter Kent doesn't waste time teaching you the latest hacks of dodgy practices that some may use but provides a great guide to build upon.

SEO For Dummies
Up relevance scores, improve page speed, optimize voice search questions, and more!
shows website owners, developers, and search engine optimizers (SEOs) how to create a website that ranks at the top of search engines and has high-volume traffic, while answering the essential question of "how do I get people to visit my site?"
One of the key aspects of learning about SEO is understanding and learning how to use Web Analytics tools such as Google Analytics and others. If you're just starting out with SEO and Digital Marketing, you'll probably want to use Google Analytics primarily because its free.
Learning about analytics is how you learn about how your blog is being viewed by others. How many readers and visitors you get, what your most successful posts are and when you're first starting out if anyone at all is actually reading your content.
How to add Fathom Analytics to Nuxt 3
My preferred Analytic platform to implement these days is the privacy focused Fathom Analytics, for few reasons, first and foremost is that as previously mentioned it is focused on privacy, so it does partake in intrusive data capture of your users and using it means you no longer need to implement one of those Cookie Warning pop ups on your site, because it doesn't use any cookies to track your users.
The second biggest benefit is that it provides simple analytics, but its also all the analytics you as a developer will ever need. In how to add fathom analytics I provide a walk-through on how to implement Fathom Analytics to your Nuxt 3 powered blog.
Checkout Why choose Fathom Analytics where I discuss why I choose Fathom Analytics for all my analytics and why I think its important all new bloggers should do the same.

How to add Google Analytics to Nuxt 3
In How to add Google Analytics to Nuxt 3 I go into detail on how to integrate Google Analytics into your Nuxt 3 developer blog. You go this route if you're not that concerned with the privacy of your users and feel you want to use a far more complicated analytics platform
Deploy your site
By the time you get to the step, your blog will be well on its way, and you'd be exploring ideas on how to explore additional aspects to implement. However, we have to keep to content of this post and get back to deploying and publishing your blog on Netlify.
The good news is if you already have a Netlify Account and have been using Github repository you're literally seconds away from getting your blog live on the internet.
To add a new site on Netlify is really easy all you need to do is to basically click the Add new site button and select the Import an existing project option
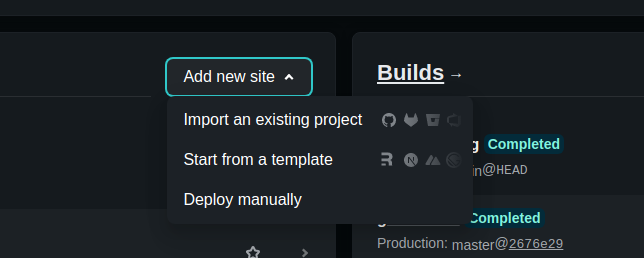
The steps from this point are really easy to follow and for the most part consist of selecting your repository on which ever account you want to use. An configuring your build environment, in most cases especially for the Nuxt project you can use the defaults provided and you'll be off to the races.
Configure your Domain
The next important step, is to buy a good domain name, personally I prefer to use NameCheap to purchase my domain names, I like the wide choice of TLD (Top Level Domain) choices.
You can also use Netlify to buy your Domain name, but cost wise and ease of ease I have found NameCheap to be best. It also really easy to configure and use Netlify to manage your DNS for your site, using an external domain registrar provider like NameCheap

Conclusion
We have reached the end of walk-through guide and if you have been following along with this guide and the referenced tutorial you should have a complete up and running.
- What is this Directory.Packages.props file all about? - January 25, 2024
- How to add Tailwind CSS to Blazor website - November 20, 2023
- How to deploy a Blazor site to Netlify - November 17, 2023