
In What are WebSockets I covered some of the basics relating to WebSockets and how they can be used to enable Real-Time bi-directional communication between client and server applications.
WebSockets provide a number of significant advantages to help implement Real-Time communication in applications, they do require specific server side support and the your service application needs to support the WebSocket protocol.
Dotnet 7 is packaged with a number of improvements and enhancements in the Networking Operations API surface and provides improved capabilities and performance of the existing HTTP and WebSockets protocols. WebSockets are now supported over HTTP/2, their handshake response information is exposed in the CollectHttpResponseDetails setting of the ClientWebSocketsOptions class and HTTP upgrade requests over WebSockets allow for the passing of a custom HttpClient instead of the one encapsulated in the request.
In this guide I am going to walk you through implementing a WebSocket in dotnet 7, as part of typical REST Based API project, I'll be making use of the API Template pack to generate the base project, but the basics of creating a WebSocket will be the same whichever API project template you prefer.
Start a new API Project
We will use the API Template Pack to generate a new API Project for us, for the purpose of this initial project we will keep it simple and not be connecting to a database at this stage. We are just going to explore the basics of getting a WebSocket up and running.
We'll create a solution file then generate a Api Project then add the project to the solution
dotnet new sln --name SampleWebSocket
dotnet new apiproject --name ApiSocket --output src/api
dotnet sln "SampleWebSocket.sln" add "src/api/ApiSocket.csproj"
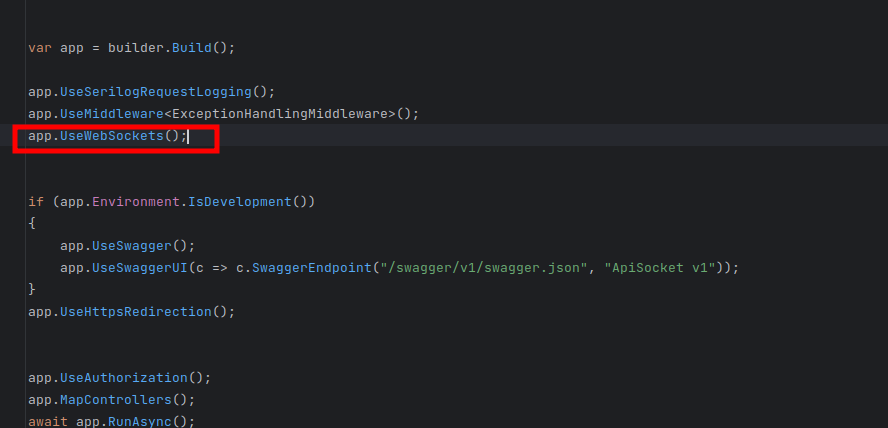
Open the solution in whichever is your preferred IDE. There is one additional configuration piece we need to do our project and add an additional line to our Program.cs we need to add the UseWebSockets to the application
Now lets add a new endpoint to enable our WebSocket Handler, we'll use the API Template pack to do this for us
dotnet new query --name SampleSocket --output ./src/api/Activities/Sockets --resource Sockets
Implement the WebSocket Code
We will implement a very simple WebSocket application just to illustrate the basics initially. The code will be contrived but it will serve to illustrate basic sequences of working with WebSockets.
We generated a a basic GET request, initially because this will serve as our UPGRADE Request, which is as I discussed in What are WebSockets , the initial WebSocket Handshake.
We can implement the code to our GET Request as follows:
We first confirm that the request is actually a WebSocket request, if it isn't then we simply return a bad request result.
If we are making a valid WebSocket request then the endpoint accepts the request and then directs action to our Echo function.
namespace Api.Activities.Sockets.Queries.SampleSocket;

[Route(Routes.Sockets)]
public class WebSocketQuery : EndpointBaseAsync.WithoutRequest.WithoutResult
{
    private readonly ILogger<WebSocketQuery> _logger;
    public WebSocketQuery(ILogger<WebSocketQuery> logger)
    {
        _logger = logger;
    }

    [HttpGet]
    [SwaggerOperation(
        Summary = "Web Socket Upgrade Request to initiate a Web Socket Session",
        Description = "Web Socket Upgrade Request to initiate a Web Socket Session",
        OperationId = "1318F7F5-4FE0-4315-BBF3-0DD1A9CABB5C",
        Tags = new[] { Routes.Sockets})
    ]
    [ProducesErrorResponseType(typeof(BadRequestObjectResult))]
    public override  async Task HandleAsync(CancellationToken cancellationToken = new CancellationToken())
    {
        if (!HttpContext.WebSockets.IsWebSocketRequest) return BadRequest();

        using var webSocket = await HttpContext.WebSockets.AcceptWebSocketAsync();
        _logger.Log(LogLevel.Information, "WebSocket connection established");
        await Echo(webSocket);
        return new OkResult();

    }
Our Echo function is just a simple function the reads input from the request and logs and responds to the user.
 private async Task Echo(WebSocket webSocket)
    {
        var buffer = new byte[1024 * 4];
        var result = await webSocket.ReceiveAsync(new ArraySegment<byte>(buffer), CancellationToken.None);
        _logger.Log(LogLevel.Information, "Message received from Client");

        while (!result.CloseStatus.HasValue)
        {
            var serverMsg = Encoding.UTF8.GetBytes($"Server Response to: {Encoding.UTF8.GetString(buffer)}");
            await webSocket.SendAsync(new ArraySegment<byte>(serverMsg, 0, serverMsg.Length), result.MessageType, result.EndOfMessage, CancellationToken.None);
            _logger.Log(LogLevel.Information, "Sent Response back to client confirming message received");

            buffer = new byte[1024 * 4];
            result = await webSocket.ReceiveAsync(new ArraySegment<byte>(buffer), CancellationToken.None);
            _logger.Log(LogLevel.Information, "Message received from Client");
        }

        await webSocket.CloseAsync(result.CloseStatus.Value, result.CloseStatusDescription, CancellationToken.None);
        _logger.Log(LogLevel.Information, "WebSocket connection closed");
    }
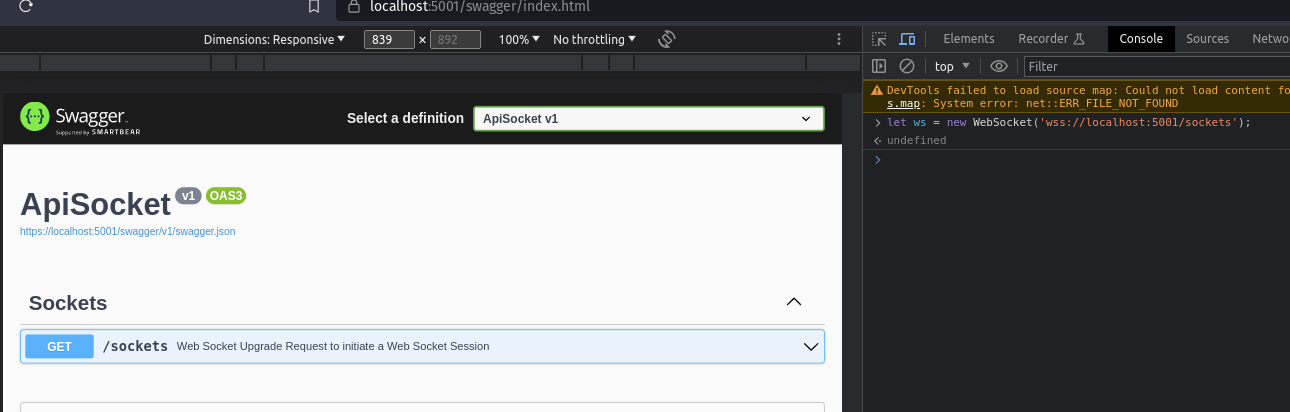
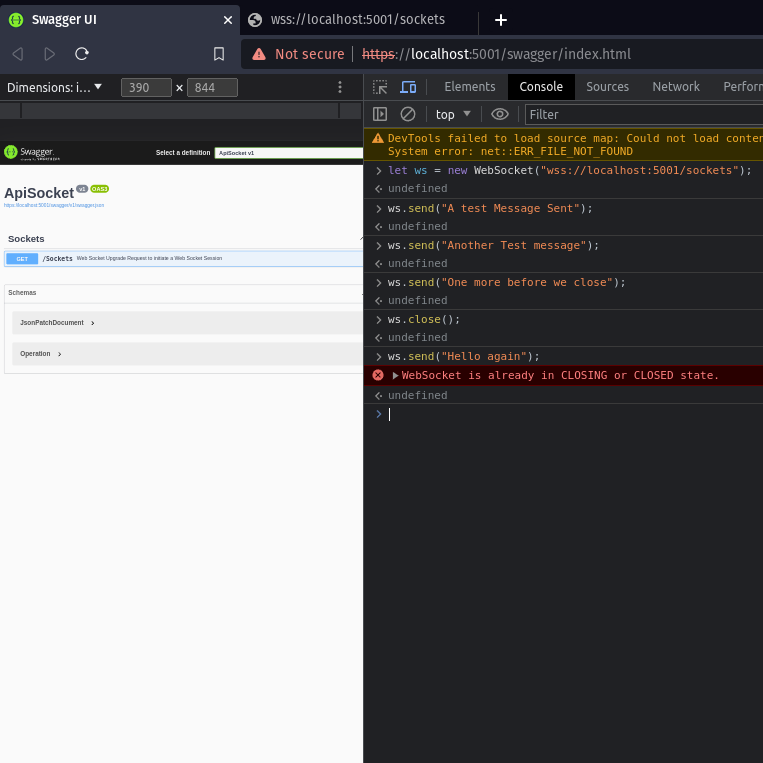
We can now run our simple app navigate to the swagger page open our Developer Tools on your preferred browser and navigate to the Console tab. Most modern HTML5-compliant browsers support the WebSocket class and therefore you can use JavaScript directly in the console of Developer tools to interact with WebSockets.
We'll define a variable of ws and instantiate it as a WebSocket and provide the url to our WebSocket function. In How WebSockets work ,WebSockets require a uniform resource identifier (URI) to use a ws: for unencrypted connections or wss: which makes use of encrypted TLS connections.
let ws = new WebSocket("wss://localhost:5001/sockets");
What the code above does, is initiates a connection between the client and the server. wss:// is the WebSockets Secure protocol since our WebAPI app is served via TLS.
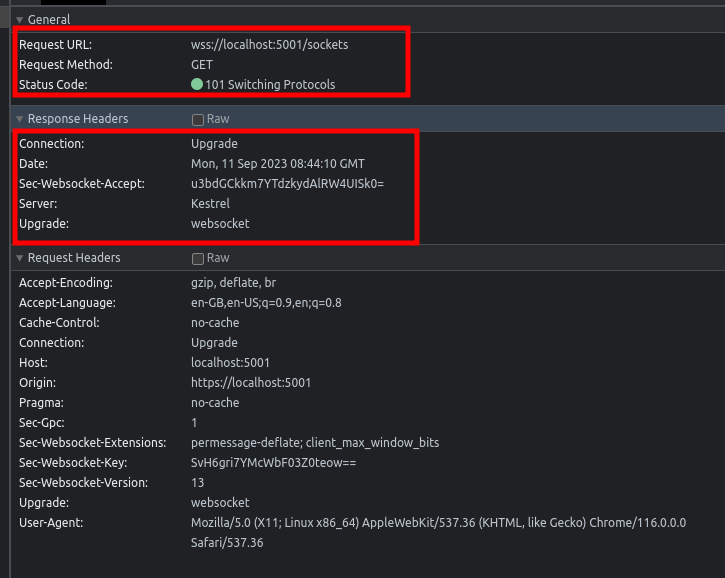
Once the command has been executed you should be able to inspect the Request and Response headers to see the headers that are actually sent.
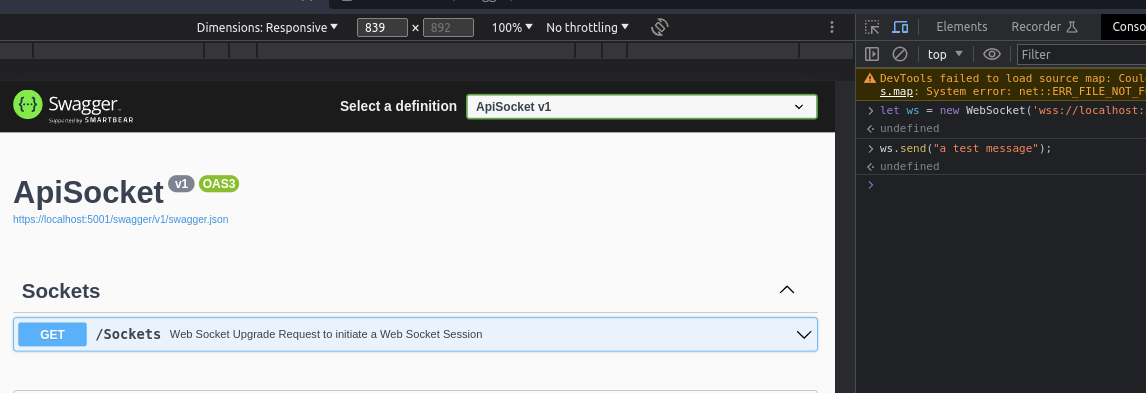
With the WebSocket connection initialised we can now start sending messages to the server and see what response we get back. To do this we can use the send available on the WebSocket. We can simply send our messages using ws.send() and put in any string literal we want to send to the server
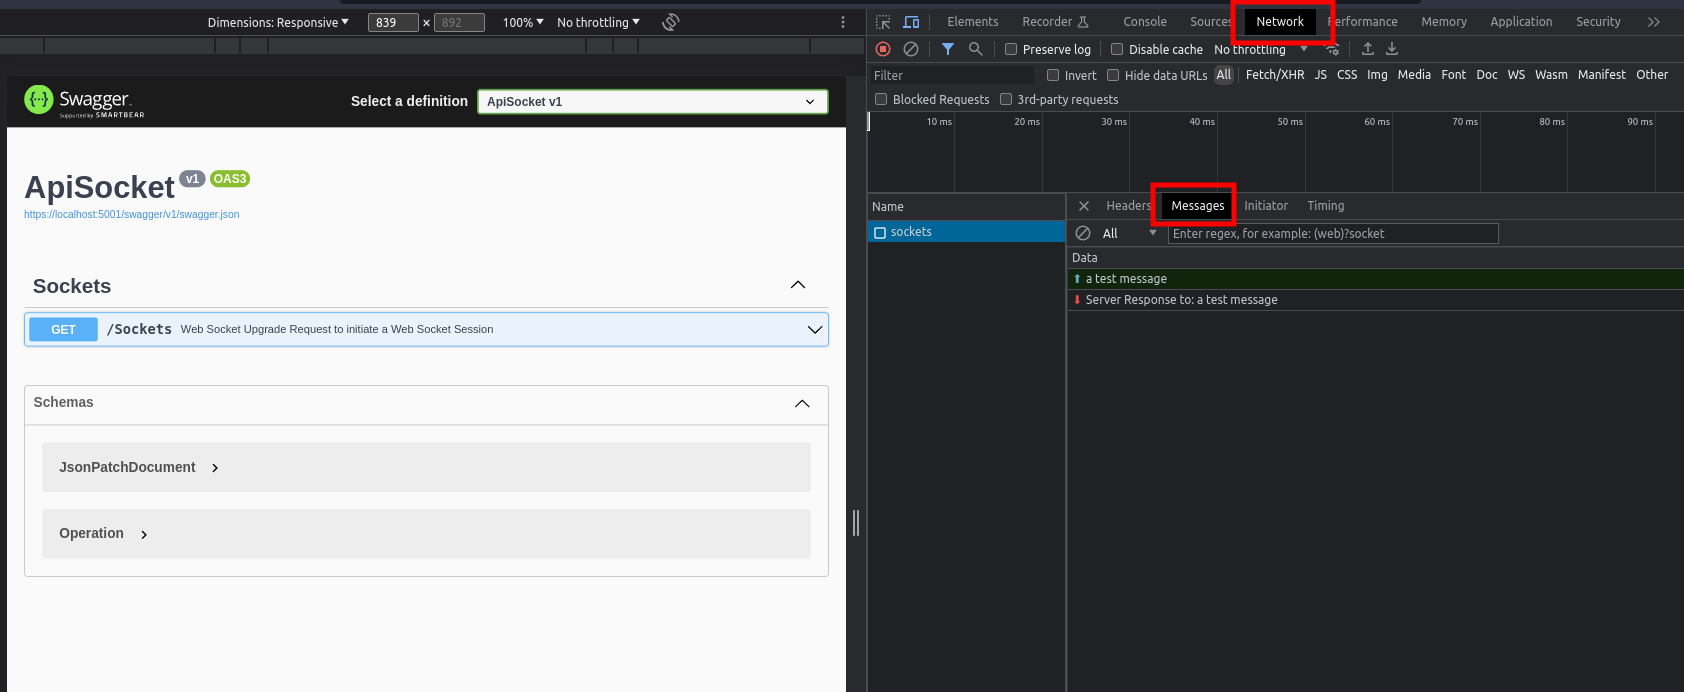
Once the message has been sent, we can head over to the Network tab in our developer tools and inspect the messages. Doing this we'll see a trail of the messages and responses.
This is Full Duplex communication. We have covered the Data Transfer aspect of WebSocket communication.
You can continue to send messages to the server and it will continue to respond, this connection will continue to remain open for as long as either client or the server terminates the connection. To close the session from the client you can simply use the close method on the WebSocket connection.
ws.close();
If we try send a message to the server, after we send the close command we'll receive a message that the connection is closing or closed.
Conclusion
In the above example we implemented a very basic example of WebSockets in dotnet and illustrated some of the fundamental features. In future forthcoming articles we will dive deeper into WebSockets and start getting into far more complex details associated with them
- What is this Directory.Packages.props file all about? - January 25, 2024
- How to add Tailwind CSS to Blazor website - November 20, 2023
- How to deploy a Blazor site to Netlify - November 17, 2023