
In Why I don't like layered architecture for microservices I discussed the reasons why the layered architecture pattern is not always the best choice when developing Microservices. The primary objection is based around how the layered architecture patterns inevitably leads to solution sprawl, too many abstractions and the creation of reusable shared objects that never end up being re-used but often lead to inadvertent coupling.
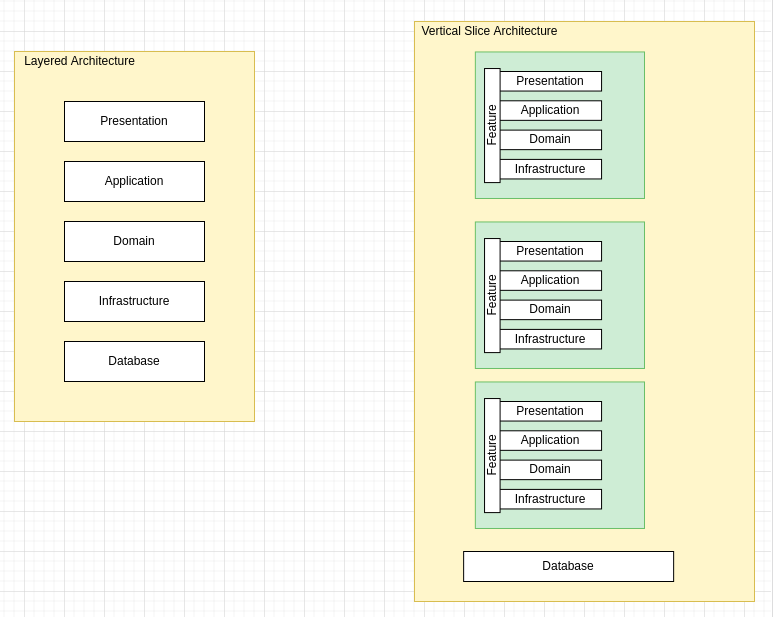
Over the past few years I have become an advocate of Vertical Slice Architecture, CQRS and Mediator pattern when it comes to developing API's for applications. In Vertical Slice Architecture an application is separated into vertical slices, meaning that a vertical slice represents the part of each layer that creates a specific feature.
In the Fundamentals of software architecture one of the reasons for the popularity of the layered architecture pattern is primarily due to its ease of understanding and not really due to its ease of use.
One of the difficulties of using the layered architecture approach are its dependencies of developers having to create abstractions and its lack of architectural modularity. The Elasticity and scalability rates for Layered Architecture are also fairly low due to the monolithic nature of deployments.
The following are some of the disadvantages of using the layered architecture
Monolithic in approach - The way the system is structured, like an onion, it's typically monolithic in its approach. Splitting off features/capabilities for things like scaling out can be a lot of effort.
Mock Heavy - Any layer that wants to talk to another layer has to be through an interface or an abstraction. This often requires Unit Tests to have a number of mocks or stubs created.
Abstractions Upon Abstractions - Repository pattern, Service pattern which leads back to rigid rules appearing on how code must flow e.g. controllers MUST talk to a service which MUST use a repository.
Heavy Coupling Inside Layers - Heavy coupling within a layer, light coupling between layers. Code is organised by function rather than feature or business process.
Fundamentals of Software Architecture
An Engineering Approach
provides the first comprehensive overview of software architecture's many aspects. Aspiring and existing architects alike will examine architectural characteristics, architectural patterns, component determination, diagramming and presenting architecture, evolutionary architecture, and many other topics.
What is Vertical Slicing
In why Vertical Slice Architecture makes sense I discussed in more detail how Vertical Slice Architecture actually originates from the practice of Vertical Slicing of user stories in Agile Software Development.
Vertical slicing is defined as narrowing a work item down to a narrow focus i.e. breaking functionality down into small pieces.
Work items have just enough scope and functionality with just enough coverage across all system components involved to be fully functional. The aim is to have all system components included so that the system can function with this piece of work. It's a process of breaking up work to split up larger features and functionality into more bite sized pieces of work.
Typically used in Agile Software Development, to enable a team to be able to execute work during a sprint so that when completed delivers value.
Vertical Slicing implies a piece of work cuts across all system layers, which can include but not limited to user interface, services, api, database and other logic used.
Vertical Slice Architecture
In Vertical Slice Architecture, A feature manages its data access code, domain logic and its presentation code, this way we can lowering the coupling and high cohesion between features. The aim is to reduce coupling between features to only concern ourselves about a single vertical slice not N-layers, which improves maintainability. Instead of dividing code by type , kind or layer, we organise it by the change we need to make. When we need to add business functionality to an application, therefore each vertical slice should contains the minimum viable code it needs to implement its feature.
Each slice is encapsulated so that the application doesn't need to know what goes on inside the slice it merely passes a Request and receives a Response.
In Vertical Slice Architecture abstractions aren’t introduced until they are needed, and very often across different boundaries than what you would typically implement in Layered architecture.
Tenets of Vertical Slicing
In Vertical Slice Architecture vs Clean Architecture: How slices fulfill layers broken promises Jimmy Bogard defines the tenets of vertical slicing
- Things that change together, belong together
- Maximize cohesion along axes of change and minimize coupling between them
Principles of Vertical Slice Architecture
Use-case Driven - System are developed based on a slice and structured around Features and Capabilities. Splitting off features/capabilities for things like scaling out is much less difficult.
Melting Abstractions - There are no gates or barriers across layers - everything needed for the system to do something is included in the slice itself where possible.
Axis Of Change - a core tenet of vertical slicing is a belief that things that change together should be near each other. Whenever a feature is added, removed, or changed the things that change should not be scattered across the entire code base. Therefore removing, deleting or editing a feature can be done by working in one folder.
Advantages of Vertical Slice Architecture
After implementing several projects using the Vertical Slice architecture I have been able to identify several advantages and have fine tuned some recurring patterns and practices that make development using this approach a pleasurable experience.
Cohesion
When one is writing an article, book or anything literature based Cohesion means that the writing is well structured with linked ideas that follow a logical pattern. The exact same principles apply when writing code, therefore Cohesion in software development is the drive and desire to have related code grouped together.
The Single Responsibility Principle (SRP) in software development instructs developers to write code that has one and only one reason to change. In Vertical Slice Architecture, we also apply this principle to a feature. If there is a change required to a feature we only need to apply that change to a single feature, and the change will have no impact on any other features. Following this principle we avoid the impact of unintended consequences of changes in our code base.
The guiding principle here is that all code that can change together belongs together.
In Software Architecture parlance this is termed as High Functional Cohesion, which refers structurally to the proximity of related elements: classes, components, services etc. From a technical perspective the definition of high functional cohesion overlaps with the goals of the bounded context in Domain Driven Design: Behaviour and data that implements a particular domain workflow.
Grouping related code that collaborates into the same namespace encourages high cohesion. A highly cohesive module results in less spaghetti code because method calls aren't jumping all over the codebase.
Command Query Responsibility Segregation (CQRS)
In what is CQRS I introduced the architectural pattern, with the intention of the pattern based on Command-Query Separation, which is a common requirement when developing Event-Driven Microservice, because an event-driven microservice is typically a small application built to fulfil a specific bounded context. Consumer microservices consume and process events from one or more input streams, whereas Producer microservices produce events to event streams for other services to consume. Communication between event-driven microservices is completely asynchronous.
I would be the first to admit that a true CQRS event driven microservices do add complexity, However, this does not mean that one cannot borrow some of the principles of CQRS and use them within your Vertical Slice Architecture. I generally do this by ensuring that my Read and Write requests and Responses and Operations are always entirely separate.
Building Event-Driven Microservices
Leveraging Organizational Data at Scale
learn how to leverage large-scale data usage across the business units in your organisation using the principles of event-driven micro-services.
Domain-Driven Design (DDD)
code is organized by feature building a domain model ends up emerging more naturally. DDD's core principles include discussion, listening, understanding, discovery and differentiation, strategic business value. Focusing on feature specific aspect of your API endpoints helps to ensure your features are delivering the required value.
Implementing Domain-Driven Design
Implementing Domain-Driven Design will impart a treasure trove of knowledge hard won within the DDD and enterprise application architecture communities over the last couple decades.
Higher-order Testing
slicing vertically enables the boundaries of tests become a lot more clearer, thus enabling the ability to write integration and even end-to-end tests with little mocking or stubbing things that are unrelated to the feature at hand.
There is no need to mock or stub complex layers of abstractions and developers can focus on writing tests more concerned with verifying and validating that the business objectives and processing are correct.
Integration tests can become a lot easier with vertical slicing because of the heavy coupling within a slice.
Feature Grouping
Adhering to the principle that things than change together, belong together, ensures that code should be placed physically near each other when possible. This enables easier process of switching out implementations depending on business need and change.
Separation of Concerns
A guiding principle when developing is Separation of Concerns. This principle asserts that software
should be separated based on the kinds of work it performs. In the layered or onion architecture you're guided to try and separate your separating core business behaviour from infrastructure and user-interface logic. Developers attempt to place business rules and logic in separate projects, which should not dependent on other projects in the application. However, to make this work they end up developing layers of abstractions and complex Dependency Injection soup.
Using Vertical Slice architecture you follow the logic of separation of concerns by separating by feature. So each feature may have its own logic to implement the feature, which may be loosely coupled with in the feature, but has tight cohesion only within the feature.
Project Structure
I have developed a project template to enable the quick and easy generation of Web API projects using the Vertical Slice Approach. In my experience the .net standard templates, in my opinion tend to guide developers down the wrong path when it comes to developing new projects and many developers mistakenly think the templates are "Best Practice" approaches and therefore attempt to follow them without question
This is amplified by the problem that configuring new projects can become a little repetitive, especially if your team are developing a lot of microservice API projects. This project template aims to provide everything you need to get up and running implementing Vertical Slice Architecture quickly. The primary aim here is NOT share code between features.
If there is common code that all features could use, then it can be extracted out and made generic so that it is not explicitly tied to anything particular and can be reused.
Nuget packages are a first class citizen within .net so extracting code out to common reusable libraries that can be shared across multiple projects is the aim here, instead of explicitly tying it to your single domain.
Install the template
The template is available as dotnet new command to create a .NET project based on a template. You will need to install the template using the command below in a terminal window.
dotnet new --install Threenine.ApiProject
Start a project using the terminal
Once the template has been installed you can start a new project using either either the terminal command line as follows:
dotnet new apiproject --name Sample --output src/api
Start a project using Rider
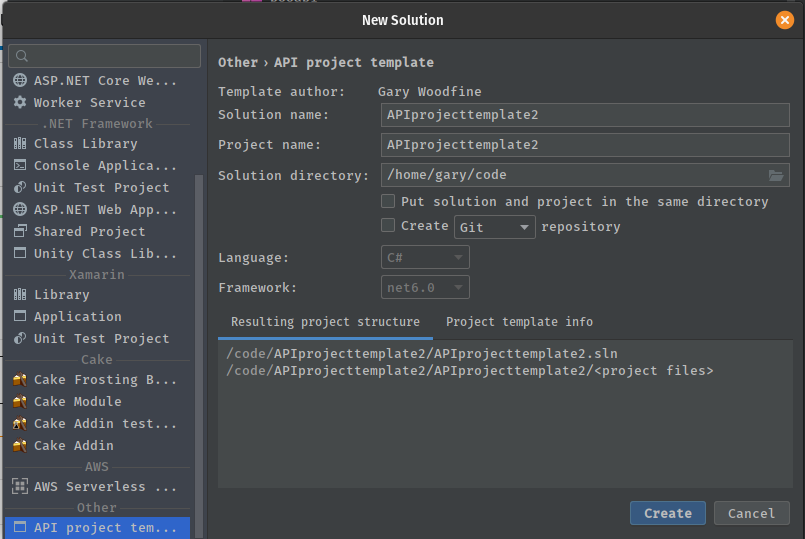
If you're using Rider: Fast & powerful cross-platform .NET IDE you can start a new project using the new project dialog by searching the ApiProject template.
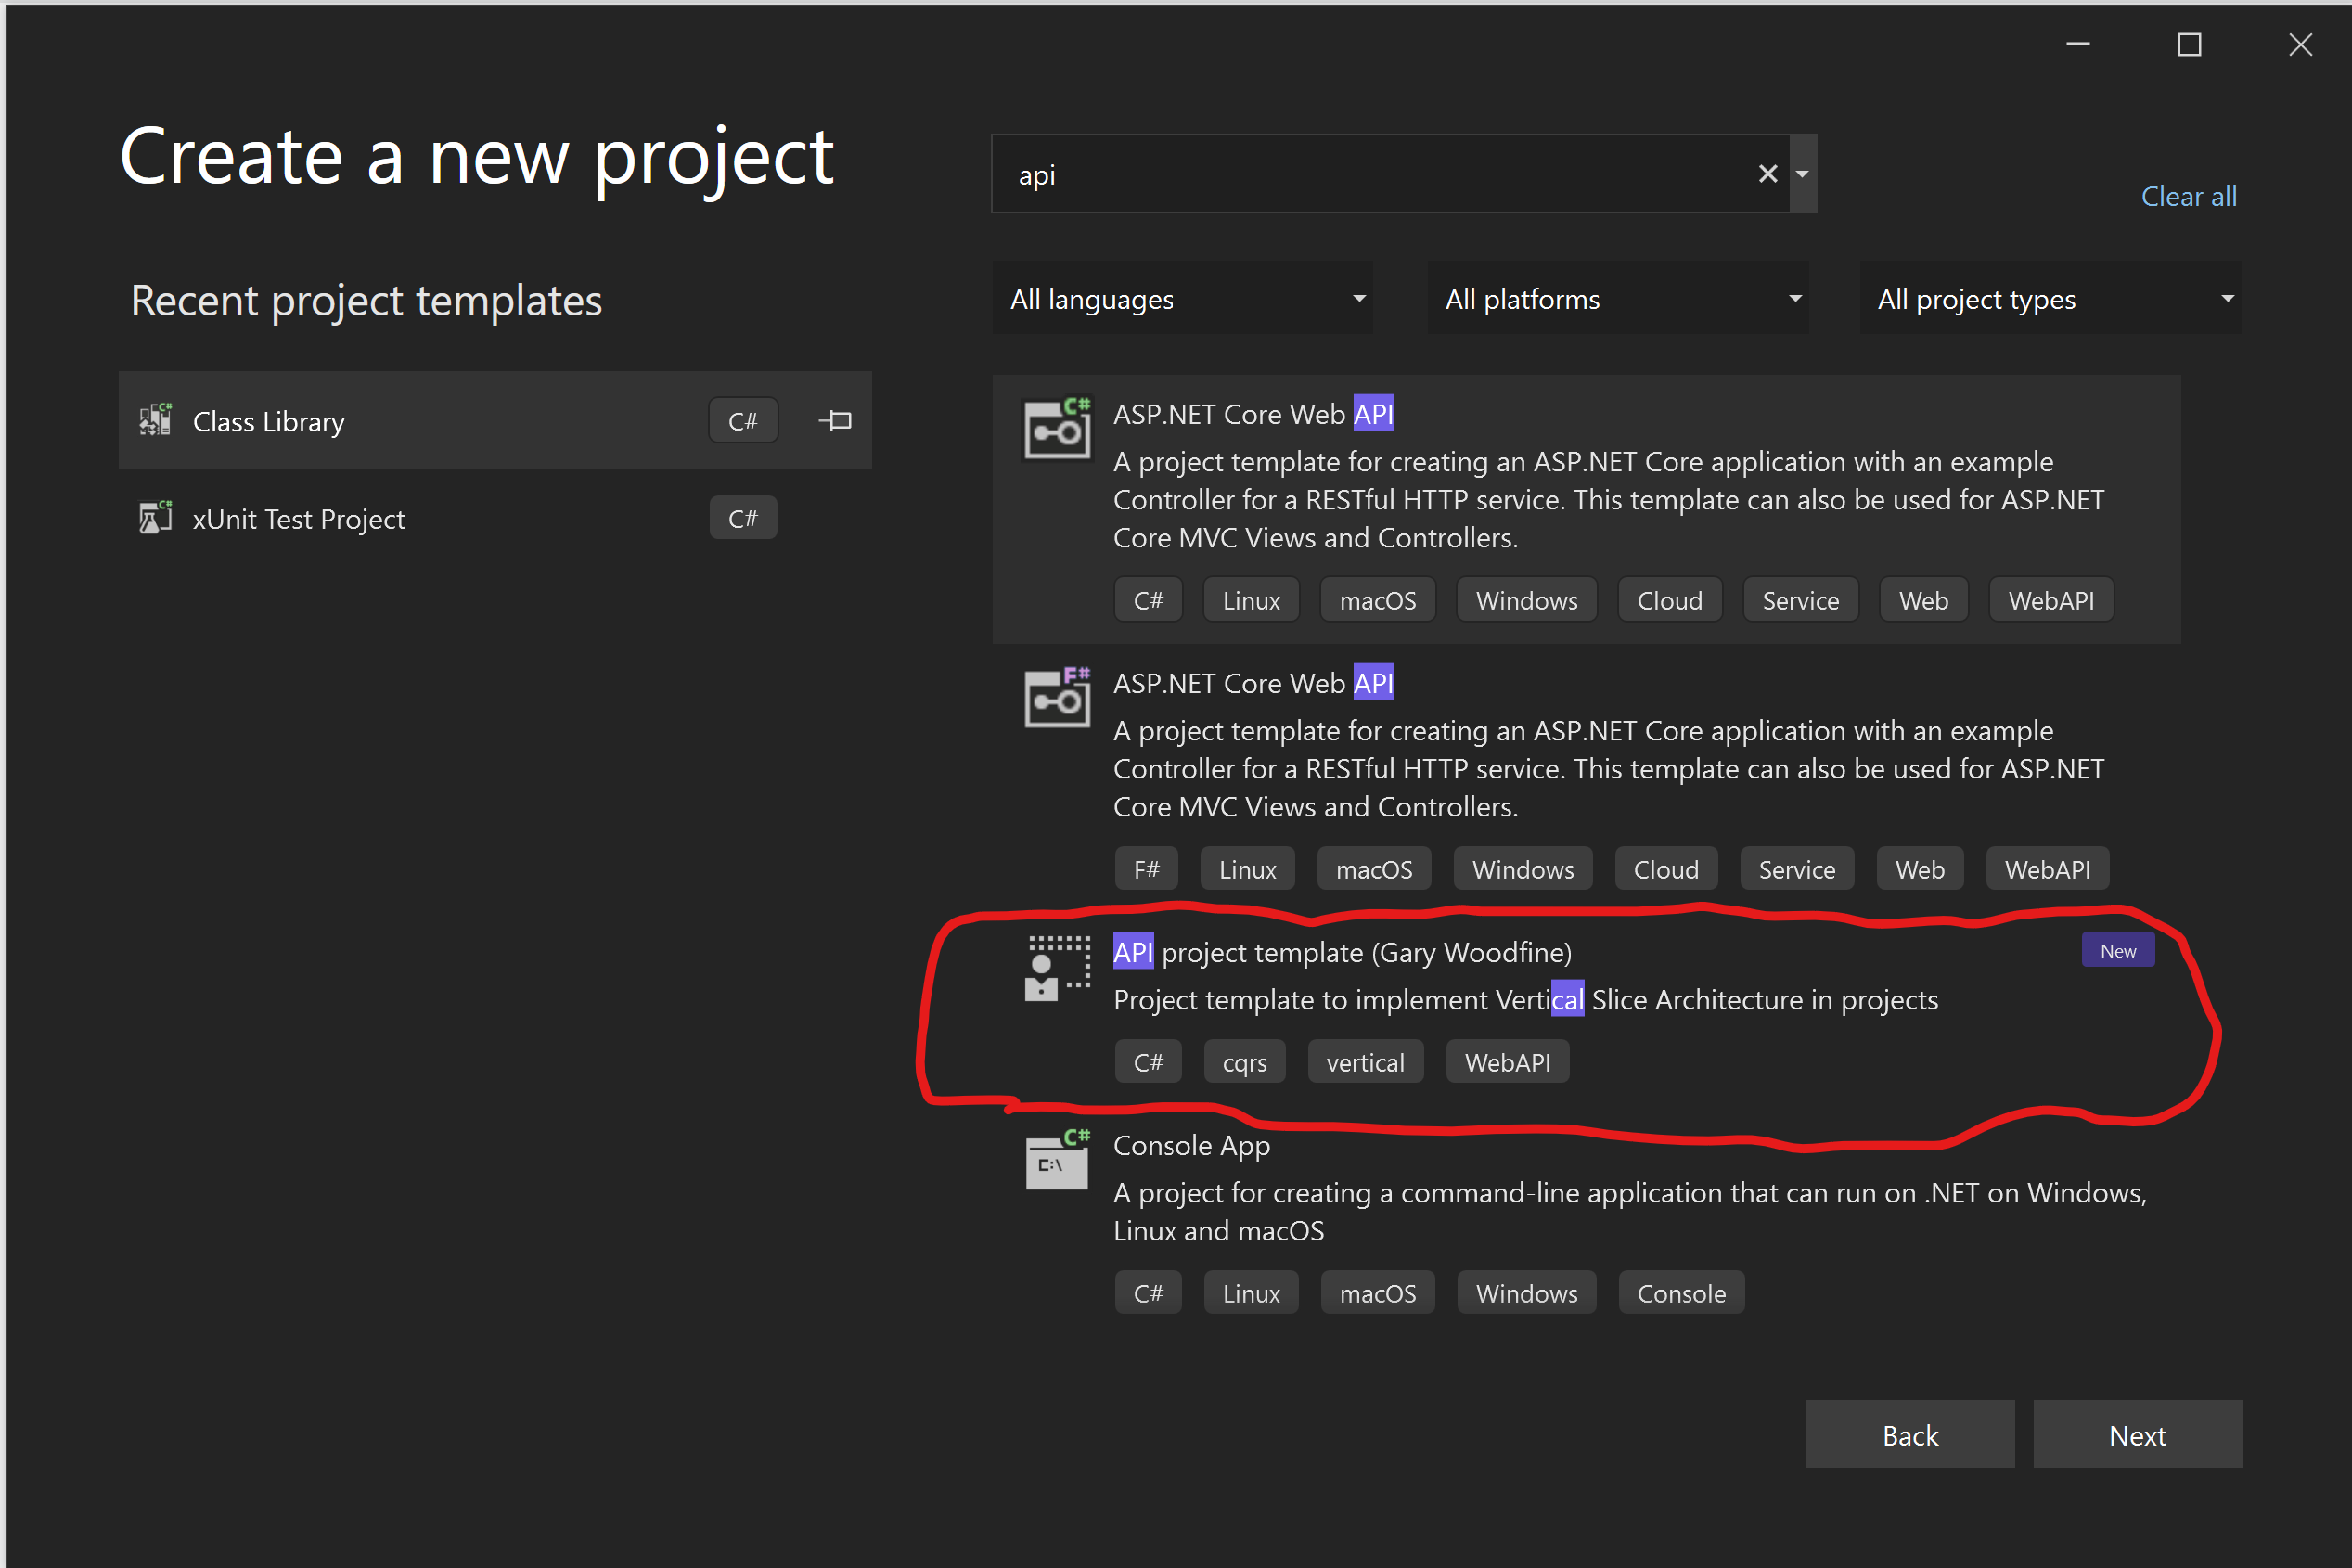
Using Visual Studio
To create a new project in Visual Studio you can use the Create New Project wizard and search for the Apiproject template
This will generate a solution as follows

For the most part this project template has all the standard items you may find in the standard project therefore some items should not need any further explanation and I will only discuss items that are relevant to the Vertical Slice Architecture
Activities Folder
There are a few naming conventions that I have encountered on my journey implementing Vertical Slices. Initially when introduced a Slice is often refered to as a Feature, which typically corresponds with the terms from Vertical Slicing in Agile: Slicing user stories in Agile software development . However, often teams may want to name the folder to infer their own terminology or parlance.
The common names I have encountered to refer to this folder are:
- Features
- Activities
- Endpoints
- UseCase
In the current implementation of the template I have opted for Activities primarily due to I have been working using the template to develop Microservices and services typically have activities that they perform.
My preference for the word Activities is mainly guided by following the Principles of Web API Design and as such Extending Job Stories into Activities and steps.
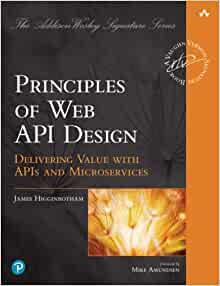
Principles of Web API
Delivering Value with APIs and Microservices
Principles of Web API Design brings together principles and processes to help you succeed across the entire API design lifecycle.
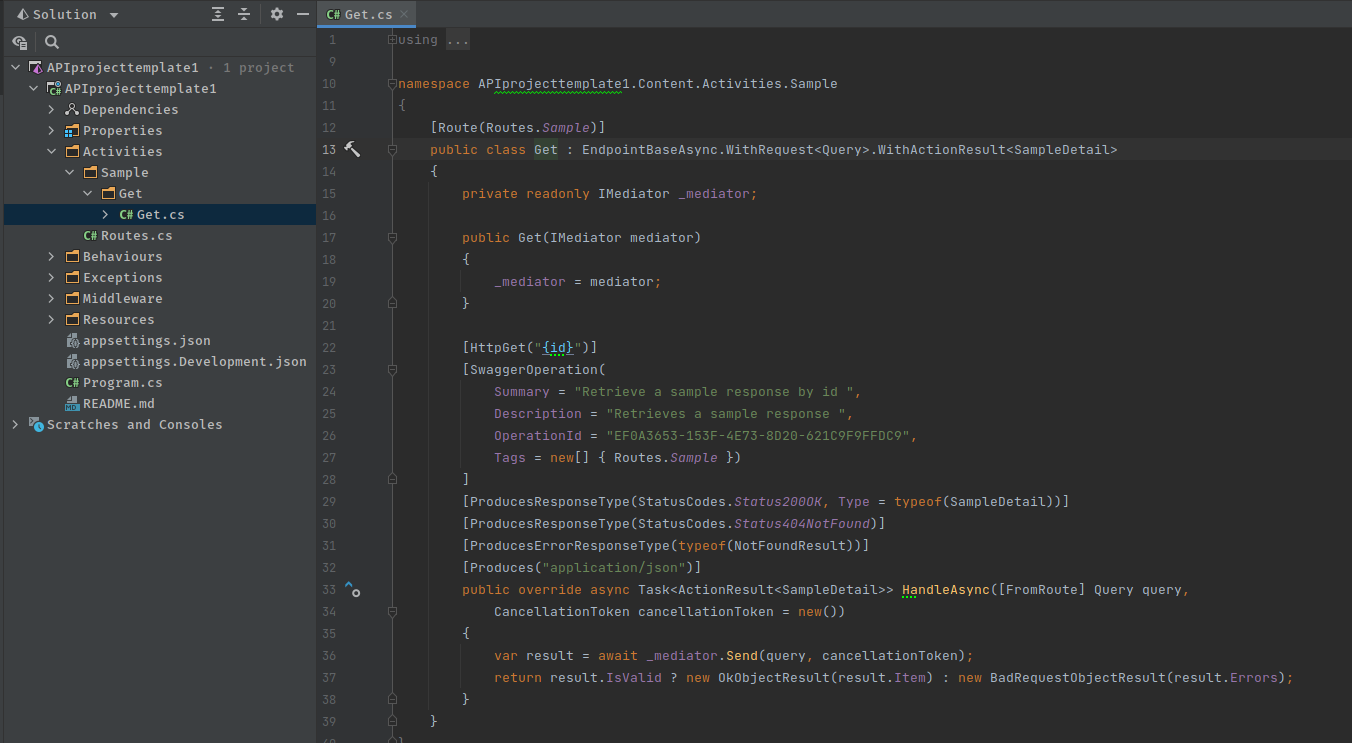
Expanding the Activities folder will reveal a Sample activity to illustrate how to implement a feature. In the sample we just have one get endpoint defined in its own folder.
We follow the Single Responsibilty Principle form the Solid Principles which are really for more eloquently and coherently defined in Adaptive Code: Agile coding with design patterns and SOLID principles
Adaptive Code
Agile coding with design patterns and SOLID principles
Applying principles from this book, will help you create code that accommodates new requirements and unforeseen scenarios without significant rewrites.
What is an Endpoint
Regardless of which word we use to describe our endpoints:
- Features
- Activities
- Endpoints
- UseCase
What we are defining is an endpoint which is one end of a communication channel. When an API interacts with another system, the touch points of this communication are considered endpoints. For APIs, an endpoint can include a URL of a server or service.
Each endpoint is the location from which APIs can access the resources they need to carry out their function.
APIs work using requests and responses. When an API requests information from a web application or web server, it will receive a response. The place that APIs send requests and where the resource lives, is called an endpoint.
REPR Pattern
The template guides you down and enforces implementing the REPR design pattern (Request-Endpoint-Response) to implementing your API endpoints.
The REPR pattern is much simpler to implement and well suited to Web API development as opposed to the traditional ASP.net MVC approach primarily because in API's there is no View Model or Presentation model we need to think about. We only have to think about Requests and Responses.
This also enforces the SRP ( Single Responsibility Principle) by ensuring the removal of the swollen controller problem because you can only write 1 end point per class.
I have previously discussed this approach in more depth in Developing Apis using Http Endpoints
Class Break down
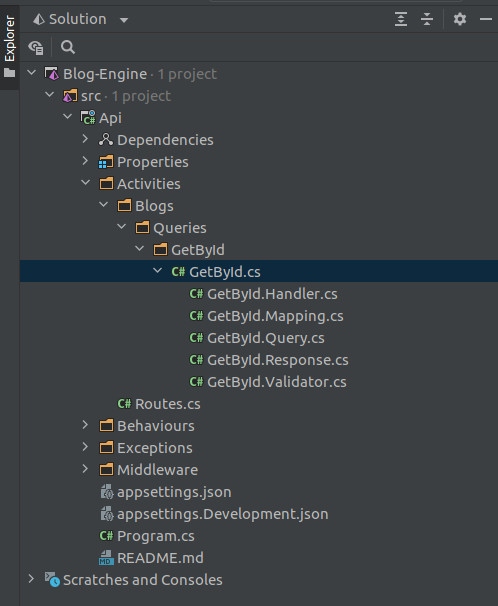
If we expand the Get class, we notice there are several classes nested below it and all these classes are used to provide the functionality only to Feature endpoint being developed.
These classes are:
- Command/Query - These Input Request to the Feature end point, Query is generally associated with Get operations , Command is associated with Post, Put, Patch and Delete operations. This borrows from the CQRS philosophy.
- Response - The outward facing response DTO that will provide the response values.
- Mapping - Contains all the mapping code for DTO/Domain makes use of autommaper
- Validator - Used to implement all validation logic using FluentValidation
- Handler - Mediatr handler
To create a new feature, in this instance we want to create a new implement creating a new api endpoints to enable creating, editing & reading blog post. Essentially the Feature will be a blog, which will also have a number sub features associated:
- Get By Id
- Get All published by status
- Get Posts by category
- Get Posts by tags
- Post new blog post
- Update Status of blog post
- Patch Update of blogs
As no doubt you'll have realised these all REST endpoints acting on a Blog resource. Each of the endpoints are feature.
Using the template we can generate a new project using the CLI we can create Solution and project using the template we installed
mkdir blog-engine && cd blog-engine
dotnet new apiproject --name Api  --ooutput src/api
dotnet new sln --name BlogEngine
dotnet sln "BlogEngine.sln" add "./src/api/Api.csproj"

#open the solution using your prefered IDE I'll use Rider
rider .
At this point we have created the basic structure of the project using the template, the solution file and opened the project in Rider ready to start developing
Lets go ahead now and start implementing the endpoints. To do this we'll change into the Activities directory of the API and create a new Folder for the feature we're going to implement, name Blogs. To do this we'll use the terminal window in Rider
cd /src/api/Activities
mkdir Blogs
Then what I like to do in this folder is create two additional folders for Commands and Queries. This will provide differentiation and split the feature up.
cd Blogs
mkdir Commands && mkdir Queries
We'll start to create our Queries first. So we'll change into that folder. We can now also use the Query template from the template pack to create our first endpoint.
There are two essential arguments we need to supply to the command to generate our query
cd Queries
dotnet new query -n GetById --Namespace Api.Activities.Blogs.Queries
This will Generate all the Stub code we need
The generated code provides the layout defined above. Each endpoint has its own set:
- Mapping
- Validator
- Query
- Response
- Handler.
We'll got through each of these classes generated by the template as we implement our vertical slice. The first we'll look at is the GetById.cs, This class follows SRP in that it does only one thing, it provides a get endpoint, as such it's already wired up to return a 200 Ok result and a typical error result. It also wired up to use mediatr and send it's query to a handler that has also been pre-generated for us.
There is very little for us to do in this class other than update our resource route and documentation pieces.
using System;
using System.Threading;
using System.Threading.Tasks;
using Ardalis.ApiEndpoints;
using MediatR;
using Microsoft.AspNetCore.Http;
using Microsoft.AspNetCore.Mvc;
using Swashbuckle.AspNetCore.Annotations;
using Threenine.ApiResponse;

namespace Api.Content.Activities.Blogs.Queries.GetById;

[Route("GetById")]
public class GetById : EndpointBaseAsync.WithRequest<Query>.WithActionResult<SingleResponse<Response>>
{
    private readonly IMediator _mediator;

    public GetById(IMediator mediator)
    {
        _mediator = mediator;
    }

    [HttpGet]
    [SwaggerOperation(
        Summary = "GetById",
        Description = "GetById",
        OperationId = "489cde9f-d34d-46d2-b5a4-352fb5f49ecf",
        Tags = new[] { "GetById" })
    ]
    [ProducesResponseType(StatusCodes.Status200OK, Type = typeof(Response))]
    [ProducesErrorResponseType(typeof(BadRequestObjectResult))]
    public override async Task<ActionResult<SingleResponse<Response>>> HandleAsync([FromRoute] Query request, CancellationToken cancellationToken = new())
    {
        var result = await _mediator.Send(request, cancellationToken);
        //Todo: Set your prefered result
        return result.IsValid ? new OkObjectResult(result.Item) : new BadRequestObjectResult(result.Errors);
    }
}
The first change we need to make, is to edit the Routes.cs file in the root of our Activities folder to add a new constant to define the name of the resource we are acting on. We do this to eliminate magic strings in our code base
namespace Api.Content.Activities
{
    internal static class Routes
    {
        internal const string Blogs = "blogs";
    }
}
We can now update our endpoint file as follows, essentially updating the summary and description information and the Route attribute with constant created.
We also know that we will be making use of Guid that will be supplied on the Route to our resource which we will name id. In this example we will keep everything else as template generated.
[Route(Routes.Blogs)]
public class GetById : EndpointBaseAsync.WithRequest<Query>.WithActionResult<SingleResponse<Response>>
{
    private readonly IMediator _mediator;

    public GetById(IMediator mediator)
    {
        _mediator = mediator;
    }

    [HttpGet("{id:guid}")]
    [SwaggerOperation(
        Summary = "Get a blog post by unique identifier",
        Description = "Retrieve the content of a blog post by providing the the identifier associated with it",
        OperationId = "489cde9f-d34d-46d2-b5a4-352fb5f49ecf",
        Tags = new[] { Routes.Blogs })
    ]
    [ProducesResponseType(StatusCodes.Status200OK, Type = typeof(Response))]
    [ProducesErrorResponseType(typeof(BadRequestObjectResult))]
    public override async Task<ActionResult<SingleResponse<Response>>> HandleAsync([FromRoute] Query request, CancellationToken cancellationToken = new())
    {
        var result = await _mediator.Send(request, cancellationToken);
        //Todo: Set your prefered result
        return result.IsValid ? new OkObjectResult(result.Item) : new BadRequestObjectResult(result.Errors);
    }
}
The next file we need to ammend is the GetById.Query.cs to add our parameter. Not really that much tht needs to discussed in this file
public class Query : IRequest<SingleResponse<Response>>
{
        [FromRoute(Name = "id")] public Guid ID { get; set; }
}
The next File would be the GetById.Validator.cs to add any validation logic we need, in this instance we most likely only want to validate that we don't get an empty guids supplied on the route. The project template uses the power of Medatr Pipeline behaviours to execute the validation logic on request. for further information how this works check out How to implement cross cutting concerns with MediatR Pipeline Behaviours and How to use MediatR Pipeline Behaviours
public class Validator : AbstractValidator<Query>
{
    public Validator()
    {
        RuleFor(x => x.ID).NotEmpty();
    }
}
The next file I usually address is the Response class. This is the outward facing DTO class that the consumer of your API will consume. In our simple example we'll flatten result and keep it simple understand. We'll add typical properties associated with blog post here.
public class Response
{
    public Guid Id { get; set; }
    public string Title { get; set; }
    public string Content { get; set; }

}
The next class we'll address is the Mapping class, this class is wired up to make use Automapper, to perform our mapping logic. In this example, I'll be making use of a predefined Database project which my project will use the Geekiam.Database.Articles project which has a a model used for Articles, we'll map from that to our Response class.
public class Mapping: Profile
{
    public Mapping()
    {
        CreateMap<Articles, Response>(MemberList.None)
            .ForMember(dest => dest.Summary, opt => opt.MapFrom(src => src.Summary))
            .ForMember(dest => dest.Title, opt => opt.MapFrom(src => src.Title))
            .ForMember(dest => dest.Content, opt => opt.MapFrom(src => src.Content));
    }
}
We are almost done implementing our endpoint, all we need to do is implement our Handler, to handle the request. In this scenario I will keep it simple and basically just retrieve the data from the database , map it to our response and return it.
In this example we'll use the Threenine.data generic repository to get the item form the database.
public class Handler : IRequestHandler<Query, SingleResponse<Response>>
{
    private readonly IUnitOfWork _unitOfWork;
    private readonly IMapper _mapper;

    public Handler(IUnitOfWork unitOfWork, IMapper mapper)
    {
        _unitOfWork = unitOfWork;
        _mapper = mapper;
    }

    public async Task<SingleResponse<Response>> Handle(Query request, CancellationToken cancellationToken)
    {
        var repo = _unitOfWork.GetRepositoryAsync<Articles>();
        var article = await repo.SingleOrDefaultAsync(x => x.Id == request.ID);
        return new SingleResponse<Response>(_mapper.Map<Response>(article));
    }
}
I have intentionally kept all the logic within this sample, simple in order to give enough of a flavour of what each of these classses do.

- What is this Directory.Packages.props file all about? - January 25, 2024
- How to add Tailwind CSS to Blazor website - November 20, 2023
- How to deploy a Blazor site to Netlify - November 17, 2023