It is inevitable that any software application being developed will at some point need to be integrated or have the ability to easily integrated with other software projects. The best way to do that is through APIs, the downside is for a long time there hasn’t been any industry standard for designing and documenting APIs.
In this post, I will discuss a few scenarios and reasons why developers will often need to develop API's and then how we can develop a Simple Web API using node.js and then document that API using Swagger.
Software development is a complex process requiring more than just writing code
We need to plan and define the base of our application first. This is what is commonly referred to as Solution Architecture. Involving more than just thinking about what you need your application to do, but rather how you intend to structure the application to meet the needs of your users.
Application Layers
Software solutions are broken up into areas and objects of interest, which we call Layers.
Similarly to property development, software development needs to start from a solid foundation. Although software development approach may be slightly different in that you can start developing different areas of the application independently and ultimately wire up the different components of the application at a later date.
Producing feature after feature without actually caring about code quality may work initially, but after a period of time it will start becoming un-maintainable and ultimately slower to continue adding new features and eventually your software development costs just start to become a bottomless pit for money! Typically referred to as brute-force-driven development.
The issue is that software development is nothing more than just building blocks of functionality on top of one another. If the lower layers of our program are poorly designed, then the whole solution will suffer because of this.
Customer Driven Development
A customer may contact you, with a requirement for a new service their company would like to launch and requires a solution based on some very sketchy details and totally unrealistic timescales. Customers also generally expect comprehensive documentation explaining how to make use of the feature.
Budget constraints are always an issue and customers never have the appropriate infrastructure in place to live up to their expectations!
This often works hand in hand, with the perception that Software is a malleable entity, in that you can easily bend and shape it to your needs as required. For the most part that is accurate, however, it is the definition of easy that becomes the sticking point.
Everything is easy once you know how
Janis Joplin
Objective
A vast majority of applications will require some mechanism to store and retrieve data from some sort of Data Repository. This may require some actions to perform on the data, either to transform it to a state it is required or even to break it up into smaller pieces that can be sent/extracted to several different repositories.
Typically this is implemented via a series of services. Modern application stacks these are implemented as RestFul Services. If you're new to developing API's you may want to quickly read through What is a Rest API .
We'll go through the process of developing a Web API making use of node.js and Swagger.
In order to build a RESTful API we need to understand how to ; <
- How to specify a web API
- How to implement routes
- How to test your API
- Content negotiation
- What is CORS
- API Versioning
- What is HATEOS ?
Simple node Web Server
Creating a web-server in node is trivial task, and ultimately only involves an initial 8 lines of code
Simple lightweight nodejs webserver
This web server doesn't do much, but it works. Assuming you have saved the code above to a file server.js you can simply run it from the terminal window by navigating to the directory and node server.js .
This is a really simple web server, and it serves as the basis of a typical Web API. However, to make it truly functional and robust requires additional development effort. <
Get your swagger on
We could go through the whole process of painfully developing each layer of our application, but who's got time for that? The customer wants the API today! So we'll go ahead and use the swagger API generator.
When developing API's the key requirement to enable other developers to use your API is to create documentation. We don't want to spend hours writing documentation when we can just generate it and wouldn't it be cool if we could generate a lot of the Grunt work too?
Enter Swagger , a popular open-source framework to help you develop and document RESTful APIs.
You may need to install swagger if you haven't done so already. It's simple just execute the following from the terminal
We can now generate our project
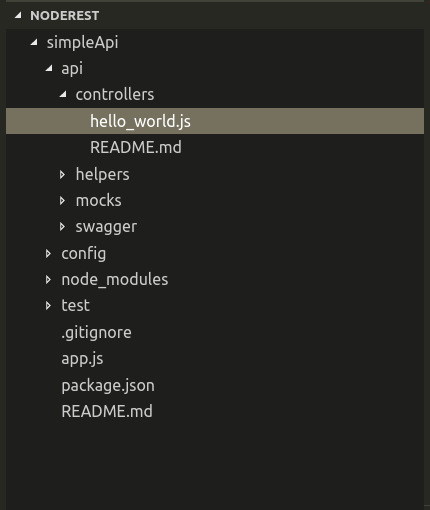
Ensure you select Express when prompted for which framework to use. Once completed, the project directory will looks as follows:

- Api - everything related to the API development, the controllers, mocks, helpers.
- config - configuration
- test - test for controllers and helpers
Swagger Editor
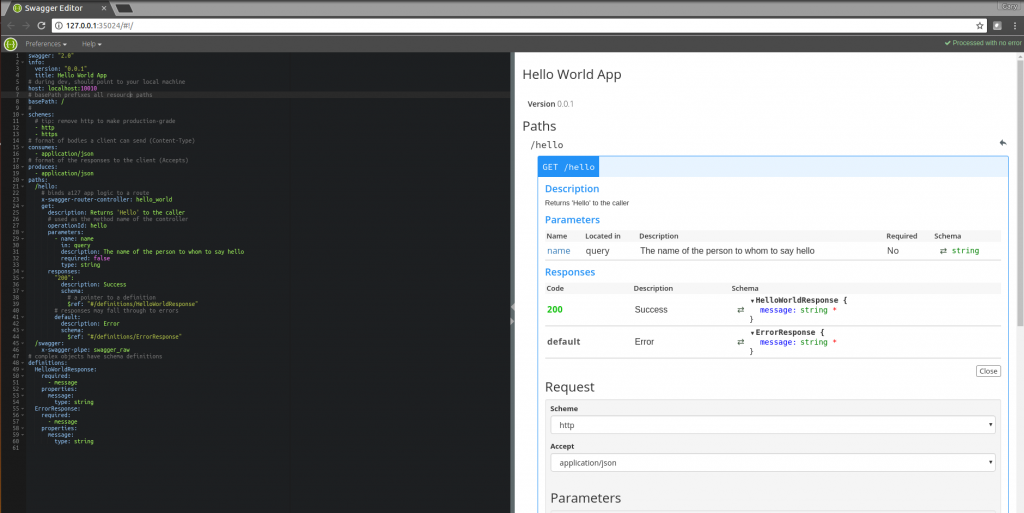
Before we run and inspect the new application, we first need learn about a new tool that has also been installed as part of the Swagger. The Swagger Editor is an elegant browser-based editor which really simplifies developing a web API.
The swagger editor helps with testing your API, by providing you a UI to access your API functionality. It also provides
- Validation and endpoint routing
- Docs on the fly generation
- Easy-to-read Yaml.
We can launch our application and the Swagger UI
Then open a new terminal window navigate to your project directory

If everything went well the editor should open your browser. On the right side of the page you should notice the example path for a GET request to /hello, so open the tab and, at the bottom, click on the button try this operation.
Take some time to explore the yaml
x-swagger-router-controller: This is the controller, the file we have in the /api/controllers/hello_world.js.
The HTTP methods are listed.
operationId: This refers to the function, in the controller, in charge of the business logic.
parameters: The list of required parameters are defined here. The parameter name is the only one and you may see that it is in the path, it is not required and it is a string.
Responses
Swagger shows its potential:
You can define a different response for each situation, given the HTTP status or errors, a particular response can be defined.
In the example, for the status, 200there is a pointer $ref to a response definition while for other statuses, we go to default with its own $ref.
In order to keep the yaml file clean, we can define all our response under definitions while at the same time reusing the definition for different responses.
Controllers
Examine the /api/controllers/hello_world.js controller, just to get familiar with thte coding style. You'll notice that code pattern follows the JavaScript Module Pattern
I have removed the comments for brevity so we can focus solely on the generated code. I recommend go through the comments as they actually do provide some additional information. Unlike most comments, I have encountered in code bases!
At first glance, there is nothing too complicated here. However, I just wanted to point out the req object (Request) has a new property available, which is not typical of the native request object, it has a swagger property. The swagger property will enable access to any prperties that have been defined i.e. Parameters.
Working with Mocks
During the course of your development, you may not necessarily want to access the database or whatever data repository. Ideally, you want things to be quick and have the ability to create certain data conditions you want to develop against. This is where working with Mock objects comes into its own.
Swagger makes working with Mocks really easy. You don't even have to create your Mock objects using the code, its simply just a matter of editing your yaml file in the swagger editor.
In order to edit the Mocks. We need to start the application again. However, this time we are going to instruct it to make use of the mocks
adding the flag -m to the command start Swagger in mock mode. We now need to open the second terminal window and start the editor again.
Create New Mock
We now want to create our new Mock for our sample application. In our example, we want to return a list of coffee cafe's that exist in a geographical area. To start off with we will keep it really simple and just return a full list of cafe's.
To Do this, in your Swagger Editor just Delete contents. Now we will add our own Methods
GET /cafe
Lines 1 - 19 just supply additional pre-amble information about your API declaration. Explicitly detailing how the API is developed using Swagger and the expected return types etc.
You could omit this information, as it may not be strictly necessary, but it is best practice to add it.
Lines 20 - 35 , actually start defining our API. We are defining a cafe controller with one Get method . At this stage we are not defining any additional parameters. We also define a Response which is going to comprise of a GetCafeListResponse, also if there is a failure we will aim to provide an error response.
Now lets go ahead and define our Response.

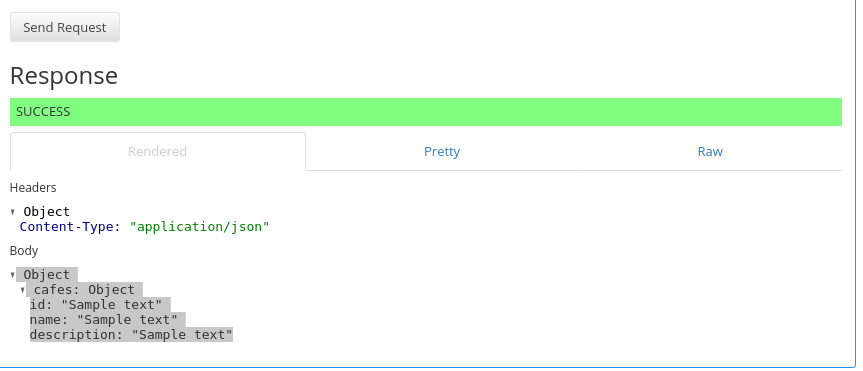
In the example, we defined an operationId, which contains the Method on the controller action which will be used to service the request. If we attempt to send a request we'll just get a sample response.
POST /cafe
Create a method to enable adding a new cafe to the list.
Advice
You do not need to use the Swagger Editor to edit your .yaml
You can use any text-based editor just navigate to (project folder)/api/swagger/swagger.yaml
You would continue to do so for all the methods you want to define. All code is available on Github
Start the Coding
We'll go ahead now and implement the logic for our system. The back-end for this system is going to be MongoDB. So we'll need to take care of some pre-requisites.
One of the pre-requisites is to ensure MongoDB is installed. You can make use of either the Docker Images or ll-mongodb-ubuntu-14-04/" target="_blank" rel="noopener noreferrer"> install MongoDb on your ubuntu desktop .
We also need to install mongoose and lodash into our project
We also need to update our app.js
The only thing really worth explaining in the code above, is that Mongoose no longer has a default promises library so we will configure Mongoose to use bluebird.
If not installed simply : npm install bluebird
We also need to add some Models so we need to create a new folder called models and add a new file cafe.js
Implement Controller Methods
We're now able to complete the controller logic in the cafe.js
Summary
Swagger helps to develop a robust RESTful API while at the same time providing an elegant documentation that can boost up cooperation among developers.
Taken the approach of Documenting as you go, helps you to focus on what you're developing.
- What is this Directory.Packages.props file all about? - January 25, 2024
- How to add Tailwind CSS to Blazor website - November 20, 2023
- How to deploy a Blazor site to Netlify - November 17, 2023