
In How to use Azure Key Vault to manage secrets we started to explore how to get started with using Azure and how to make use of it secrets manager. In this post we're going to dive a little deeper and explore how to utilize another commonly required aspect for enterprise software application and the ability to store documents, images and various other data files. Which is commonly referred to as Blob Storage
What is Blob Storage
In computing a Blob is used to define a Binary Large OBject, as data in binary form. Critical Business data can be of any type, blob storage is particularly useful for storing media, such as audio and video, and frequently changing data, such as log files.
This focus on unstructured data storage makes sense given the recent enterprise shift to managing and analyzing unstructured information. The age of carefully filed data and organized databases has given way to a blend of both structured and unstructured data: if enterprises use both, enterprises need to store and analyze both.
Azure Blob Storage is an object storage solution that can store unstructured data, which includes email, video, and binary data. Blob Storage supports data streaming and random access use cases. Object storage keeps files or blobs in a flat "data lake" or "pool" with no hierarchy; a data lake/pool is a large collection of unstructured data.
What are the advantages of blob storage?
- Scalable: Blob storage capacity is practically unlimited. And as the amount of stored data grows, it remains easy and fast to save data for later retrieval.
- Cloud-native: Blob storage is hosted in the cloud. This makes blob storage a natural fit for organizations building in or migrating to the cloud. This also means blob storage can be accessed from any location via the Internet, as is the case with all cloud services.
- Programming language agnostic: Blob storage providers usually allow developers to use a wide range of languages to access their blobs.
- Cost-effective: Blob storage usually has tiered pricing. Data that is rarely accessed is in a much cheaper tier, meaning large amounts of data can be stored more cheaply overall if most of it is not accessed regularly.
How to create an Azure Storage
In How to use Azure Key Vault to manage secrets I introduced the Azure CLI and introduced how to use to interact with the Azure using the terminal. This is my preferred way to create and manage objects in Azure.
az storage account create --name gwstoragetutorial --resource-group VaultTutorialRG-dev --location ukwest --sku Standard_LRS
Assign Azure Role
In order to be able to interact with Azure Storage you will need to assign a role to your User or Application. In this case we will assign the role of Storage Blob Data Contributor to my account. Just so I can run this application locally. However, we will also need to add this Role Assignment to our Application Container when we deploy the application to Azure.
Azure Active Directory (AAD) authorizes access rights to secured resources through Azure role-based access control (Azure RBAC). Azure Storage defines a set of Azure built-in roles that encompass common sets of permissions used to access blob data.
When you create the Storage account above you will get the long string required in the -- scope parameter and don't forget to add the your email address or the name you want to add to the --assignee parameter.
az role assignment create \
    --role "Storage Blob Data Contributor" \
    --assignee <email> \
    --scope "/subscriptions/<subscription>/resourceGroups/<resource-group>/providers/Microsoft.Storage/storageAccounts/<storage-account>/blobServices/default/containers/<container>"
All Code Samples for this Tutorial are available
Uploading documents to Azure Blob Storage
We have now completed building our infrastructure part that we require. We can now configure our application to make use of it, and just like we did How to use Azure Key Vault to manage secrets we are going to make use of the Azure client library integration to configure our Azure Blob Client.
We will continue making use of the solution we created using the API Template Pack in How to use Azure Key Vault to manage secrets
To do so we will edit our Program.cs and add the configuration to configure the Azure Blob Client.
builder.Services.AddAzureClients(clientBuilder =>
{
   // Add a KeyVault client
    clientBuilder.AddSecretClient(new Uri($"https://{keyVault?.Vault}.vault.azure.net/"));
    // Add a BlobServiceClient
    clientBuilder.AddBlobServiceClient(new Uri(" https://gwstoragetutorial.blob.core.windows.net/"));
    clientBuilder.UseCredential(new DefaultAzureCredential());
});
We can generate a new Endpoint using the API Template Pack Command Endpoint Template to generate out REST API Command endpoint to handle uploading of documents.
dotnet new command --name Post --resource Documents --output ./src/Api/Activities/Documents
This will generate all the files we require to implement the REST API endpoint

The next step is edit the Post.Command.cs to add the ability to provide a file to upload so we will simply add a property using IFormFile interface
public class Command : IRequest<SingleResponse<Response>>
{
  [FromBody] public IFormFile  File { get; set; }
}
We can add a little bit of validation to ensure that no empty values are passed to the file upload, by adding our validation logic too our Post.Validator.cs.
public class Validator : AbstractValidator<Command>
{
    public Validator()
    {
        RuleFor(x => x.File).NotNull().NotEmpty();
    }
}
We can now simply now write our code in the handler to upload the file. The first step is to ensure we inject the client into our Handler
public class Handler : IRequestHandler<Command, SingleResponse<Response>>
{
    private readonly BlobServiceClient _defaultClient;

    public Handler(BlobServiceClient defaultClient)
    {
        _defaultClient = defaultClient;
    }

    public async Task<SingleResponse<Response>> Handle(Command request, CancellationToken cancellationToken)
    {
        var containerClient = _defaultClient.GetBlobContainerClient("documents");
        var blobClient = containerClient.GetBlobClient(request.File.FileName);
     var result=   await blobClient.UploadAsync(request.File.OpenReadStream(), true, cancellationToken);

        return new SingleResponse<Response>(new Response
        {
            Tag = result.Value.ETag.ToString(),
            Created = result.Value.LastModified.DateTime,
            Reason = "Created",
            StatusCode = StatusCodes.Status201Created.ToString(),
        });
    }
}
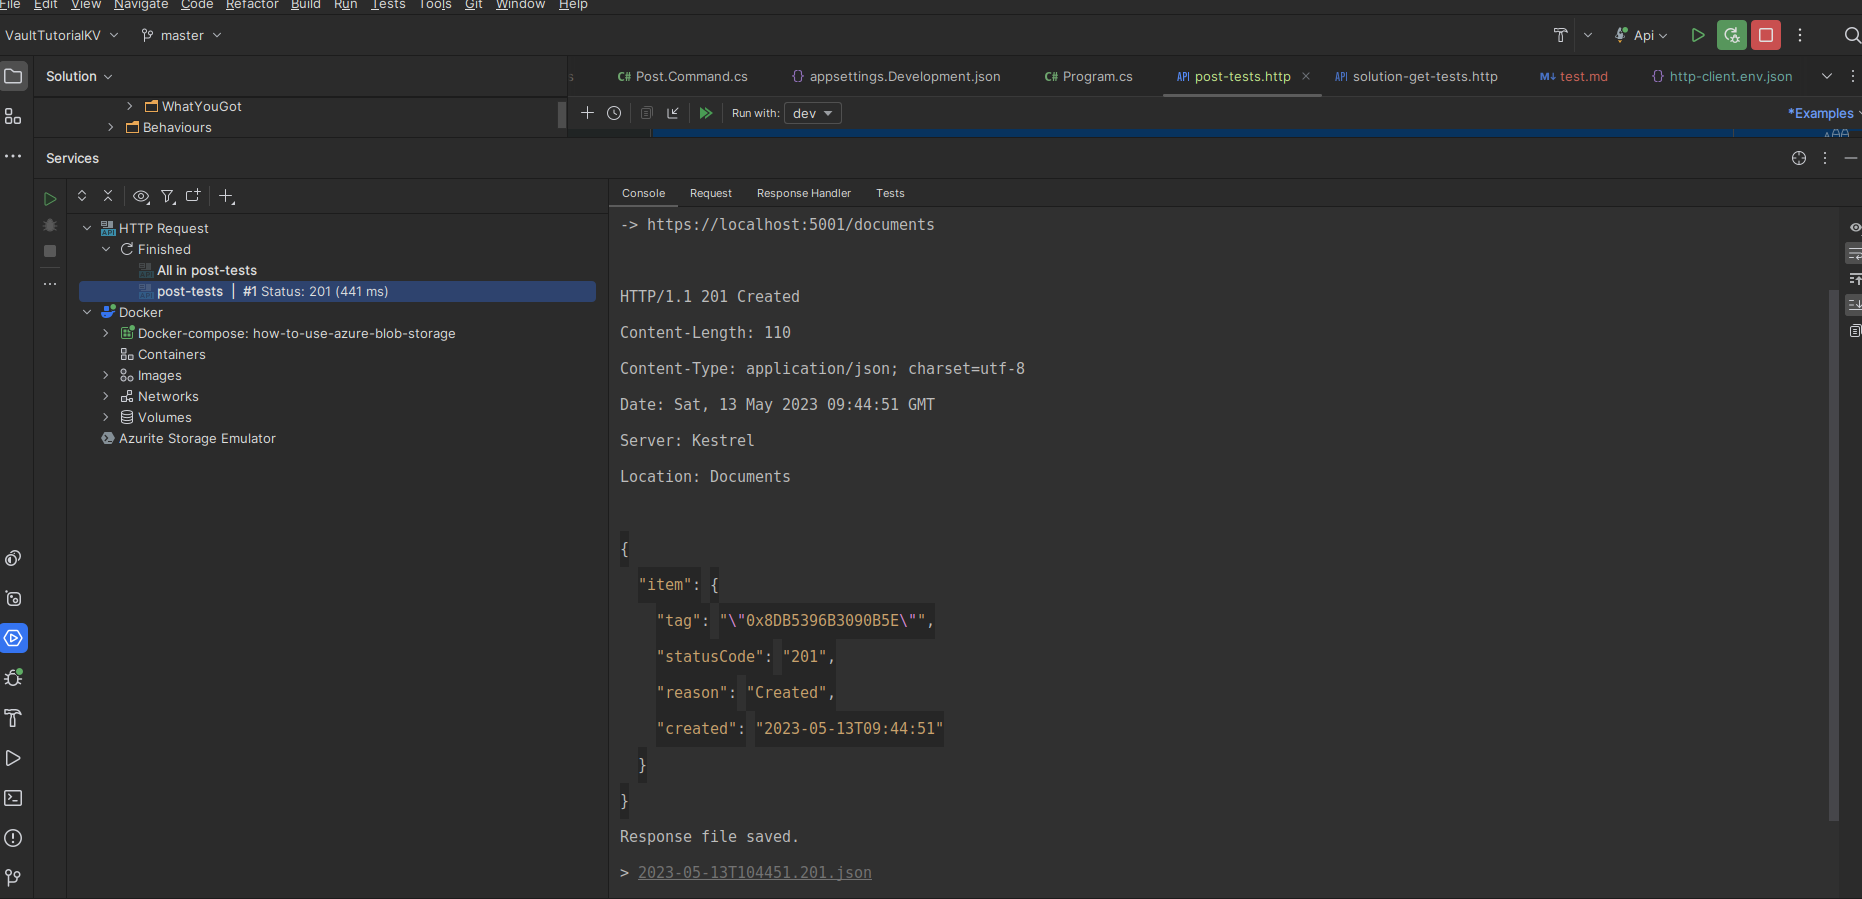
We write our HTTP End Point tests to verify the accounts.
POST {{host}}/{{documnets_resource_name}}
accept: text/plain
Content-Type: multipart/form-data; boundary=WebAppBoundary

--WebAppBoundary
Content-Disposition: form-data; name="File"; filename="test.md"

< test.md

--WebAppBoundary--

> ../../../Asserts/Should_be_201.js

###
The Results of our tests will be displayed as follows
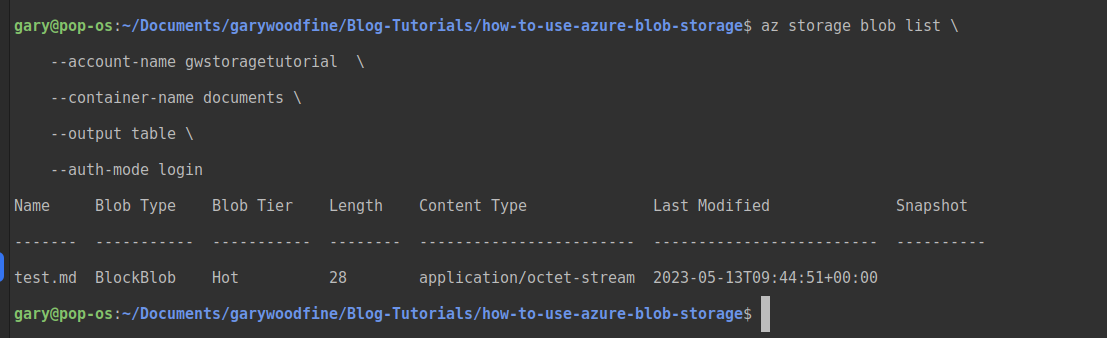
We can now also verify that our document has been loaded up to our Azure Storage by using the Azure CLI
az storage blob list \
    --account-name <storage-account> \
    --container-name <container> \
    --output table \
    --auth-mode login
Its output will render as follows and we can verify that our upload has succeeded and the document has been uploaded to our storage container.
Getting documents from Azure Storage
We have now successfully uploaded a file to our Azure. Before we can proceed with implementing the download functionality we have to update our account permissions to include the Least privileged built-in role: Storage Blob Data Reader
We can implement an endpoint to get the document from Azure Portal. We'll use the API Template Pack to generate a Get Request for us.
dotnet new query --name Get --resource Documents --output ./src/Api/Activities/Documents --force
How handle larger file uploads
One of the issues of using the approach defined above when it comes to larger files is that we are making use of the IFormFile which will attempt to spool the entire file into memory and with the large files this will become a problem. In truth, with File Uploads in general when it comes to dotnet we don't want to use Model Binding at all.
In order to support large file uploads we will need to make use of Multi Part requests, which combine one or more sets of data into a single body, separated by boundaries. Typically, these requests are used for file uploads and for transferring data of several types in a single request.
- What is this Directory.Packages.props file all about? - January 25, 2024
- How to add Tailwind CSS to Blazor website - November 20, 2023
- How to deploy a Blazor site to Netlify - November 17, 2023