
In How to use Terraform with Digital Ocean I walked through the process of how to set up and configure your Linux development computer to enable you to developing your project deployment infrastructure using Digital Ocean and Terraform. I introduced and configured a couple of tools we will continue to use throughout this tutorial series and also shared some additional tips I use to make working these tools even more simpler.
In this post we are going to build on that foundation and start to create and deploy our Kubernetes node to which we will eventually deploy our microservices too making use of Digital Ocean
What is Digital Ocean
Most Enterprise software developers, are undoubtedly familiar with AWS, Azure or GCP as cloud providers, because these are the names most larger organisations will turn to solve their Cloud Problems. They're also far more complicated and expensive to use for smaller teams to use, for smaller scale Cloud Native applications.
Digital Ocean, is by far more smaller developer team focused cloud provider and by far more affordable to use for smaller scale projects, without complicated and confusing billing schedules.
Digital Ocean is far more focus around the needs and desires of the Developer and have made it extremely easy for developers to use and benefit from their systems. So much so if you use this link to sign up to Digital Ocean you'll get $200 in credit over 60 days to learn and use their system.
Using Digital Ocean provides you with the ability to use
- Droplets: Your basic VM solution, starting at $5 a month
- Volumes: Hard drives for your droplets
- Databases: Managed databases
- Spaces: S3 like blob storage
- Images: Manage your VM snapshots and backup, your Docker images
- Networking: DNS, IP, load balancers, VPC, and firewall are all in there
- Monitoring: an optional monitoring solution for your droplets
- Kubernetes: The DigitalOcean managed Kubernetes service
Prerequisites
To follow along with this tutorial you will need the following :
- A Digital Ocean Account, if you do not have one yet, Sign up for a new Digital Ocean account and get free credit
- Completed the How to use Terraform with Digital Ocean to get your Workstation configured to start developing with Digital Ocean and Terraform
What is Terraform
Terraform is a solution from HashiCorp which allows managing Infrastructure As Code (IaC). Enabling you to define your desired state and terraform manages to build the desired infrastructure, using a modular system of providers.
IDE Configuration for Terraform
In this post, we're going to start actually writing Terraform code and as such you may want to configure your IDE (Integrated Development Environment) or text editor in order to have some syntax highlighting, auto completion and a few other features that will help making with terraform more of a pleasurable experience.
Regular readers and followers of my blog, will know that I am a big fan of Jetbrains based IDE's and tend to use them for most of my development work. It will therefore be unsurprising then, when I recommend installing Terraform and HCL plugin to whichever is your preferred IDE. In my case, it's usually WebStorm, Rider, CLion and IntelliJ , yours may vary and that is a very good thing.
If you're using an alternative IDE, then more than likely there will be a similar Terraform plugin available to use.
How To Structure a Terraform Project
Learning how to structure Terraform projects appropriately to their use cases and perceived complexity is essential to ensure their maintainability and extensibility in day-to-day operations. A systematic approach to properly organizing code files is necessary to ensure that the project remains scalable during deployment and usable to you and your team.
A typical terraform project is structured according to common features of terraform :
- Providers
- Variables
- Datasources
- Provisioners
- and more....
For the most part a Terrafom project structure tends to follow a convention over configuration approach, where each file is responsible for defining the configuration of a specific item of the infrastructure.
In this initial sample application we will start creating a very simple Kubernetes cluster therefore all the files at this stage will be in one folder just for brevity and clarification. However, as this series progresses we'l' discover how to make use of folders and other considerations to bare in mind when developing Terraform infrastructure as code projects.
For the stake of this intro tutorial we're going to create 4 files, and we'll go through each as we go along but in the mean time we can create the files in a directory, as follows.
.
├── cluster.tf
├── provider.tf
└── variables.tf
How to define a provider with Terraform
I mentioned previously that you can use Terraform to define your Infrastructure as code with almost any Cloud Provider, and terraform enables you do this making use of a modular system of providers.
Providers are a logical abstraction of an upstream API, responsible for understanding API interactions and exposing resources. Each provider has its own specifications and capabilities. For the pur
The DigitalOcean provider lets Terraform interact with the Digital Ocean API to build out infrastructure. The Digital Ocean provider supports creating various Digital Ocean resources.
Our first step of writing our initial Terraform scripts is to define and add the Digital Ocean Terraform provider to your project, define the project variables, and declare a Digital Ocean provider instance, so that Terraform will be able to connect to your account.
In How to use Terraform with Digital Ocean we installed Terraform and Doctl, the Digital Ocean CLI which we'll also be making use of in this post, and we created some Terraform based aliases and configured our bash CLI to use DIGITALOCEAN_TOKEN environment variable.
We're going to starting editing our provider.tf and add the following code to instruct terraform we will be making use of the Digital Ocean Provider.
terraform {
  required_providers {
    digitalocean = {
      source  = "digitalocean/digitalocean"
      version = "~> 2.0"
    }
  }
}
We could run our terraform init now and this will install the provider for us to continue to use.
In the code above we have declared a module requires particular versions of the Digital Ocean provider, using the required_providers block inside a terraform block.
A provider requirement says, for example, "This module requires version that greater than or equal to v2.0 of the provider digitalocean/digitalocean and will refer to it as digitalocean.
The provider does not specify any of the configuration settings that determine what remote endpoints the provider will access etc.
We are going to be running our completed script using Github Action when we commit to repository, so we will need to be able to provide a Personal Access Token (PAT) to our script. In order to do this we will need to create a variable in our script to store this value and make it publically accessible.
To do this, we can edit our variables.tf file and create a variable which we'll name do_token
# Personal Access Token required to execute the script
variable "do_token" {}
In How to use Terraform with Digital Ocean I detailed how you can can configure an alias using bash to provide your PAT token to this variable so you don't have to remember adding it all the time.
Once we have defined our variable we can now edit our provider.tf to ensure we pass our variable to the provider.
terraform {
  required_providers {
    digitalocean = {
      source  = "digitalocean/digitalocean"
      version = "~> 2.0"
    }
  }
}

provider "digitalocean" {
  token = var.do_token
}
How to define and create a Kubernetes cluster
With our provider all configured we can now move onto defining our Kubernetes cluster, this is also now we will start to make use of the doctl to help us get some additional information we'll need to pass into our configuration.
The first step into setting up our cluster.tf file is to declare the resource we want to target, in this case we are going to make use of the digitalocean_kubernetes_cluster so we can define it as such below, in my case I am going to name my cluster after the name of the application I am creating, "geekiam"
resource "digitalocean_kubernetes_cluster" "geekiam" {

}
We now need to provide some further detail about the cluster we want to create, but first we need to create some additional variables in our variables.tf, We can make use of the doctl commands to query some the data we'll need to provide a value to our variables.
You'll want to configure these values to what your requirements are.
## K8s variables

variable "application_name" {
  type = string
  default = "geekiam"
}

# doctl k8s options regions
variable "k8s_region" {
  type = string
  default = "lon1"
}

variable "k8s_node_count" {
  type = number
  default = 1
}

# doctl k8s options sizes
variable "k8s_size" {
  type = string
  default = "s-2vcpu-2gb"
}

#  doctl k8s options versions
variable "k8s_version" {
  type = string
  default = "1.25.4-do.0"
}

## END K8s Variables
With our variables defined we can go ahead and configure our K8s resoource. For the purpose of this particular tutorial we are going to provide our variables with default values, that our script will use if no values are supplied, this will be suffice at the moment. However, as we progress further in this series of tutorials we discover how we can provide alternate values to our variables when executing our terraform commands.
resource "digitalocean_kubernetes_cluster" "geekiam" {
  name    = var.application_name
  region  = var.k8s_region
  version = var.k8s_version

  node_pool {
    name       = "geekiam-worker-pool"
    size       = var.k8s_size
    node_count = var.k8s_node_count
  }
}
The benefit of taking the time to define the variables and reusing them at this point may not be abundantly clear at this point but it does make it easier to pass new values in when using the script.
With all the above we configured our Digital Ocean Cluster, we can now use that the output of the above to complete the Kubernetes configuration. We can use the attributes generated to pass to our Kubernetes configuration
provider "kubernetes" {
  load_config_file = false
  host  = digitalocean_kubernetes_cluster.geekiam.endpoint
  token = digitalocean_kubernetes_cluster.geekiam.kube_config[0].token
  cluster_ca_certificate = base64decode(
    digitalocean_kubernetes_cluster.geekiam.kube_config[0].cluster_ca_certificate
  )
}
Initialise the deployment
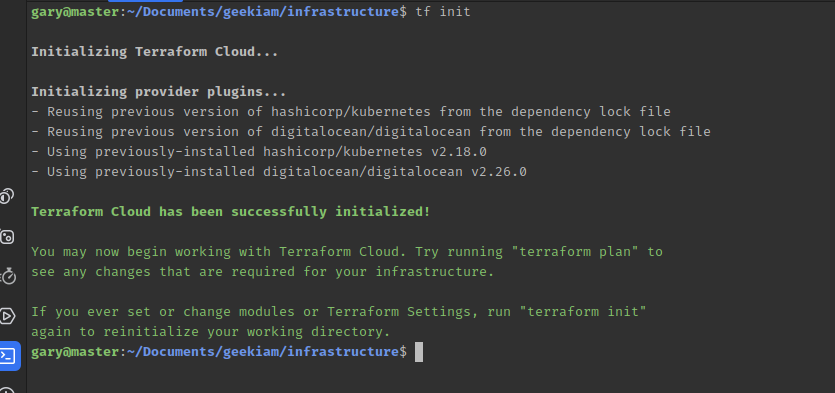
We've created the foundation of our script at this stage, so we can now carry out some tests to check it works. This is where we'll start making use of the short cuts we previously configured in How to use Terraform with Digital Ocean, we'll have to initialise Terraform on our directory using the CLI
tf init
Executing this task will download the providers we configured or as in my case below just validate which version we will use from any previous initialisation. After this command has completed you will see a new file in your directory has been created .terraform.lock.hcl which is the Dependency Lock File , which Terraform uses to determine which versions dependencies are potentially compatible with the current configuration and which versions are currently selected for use.
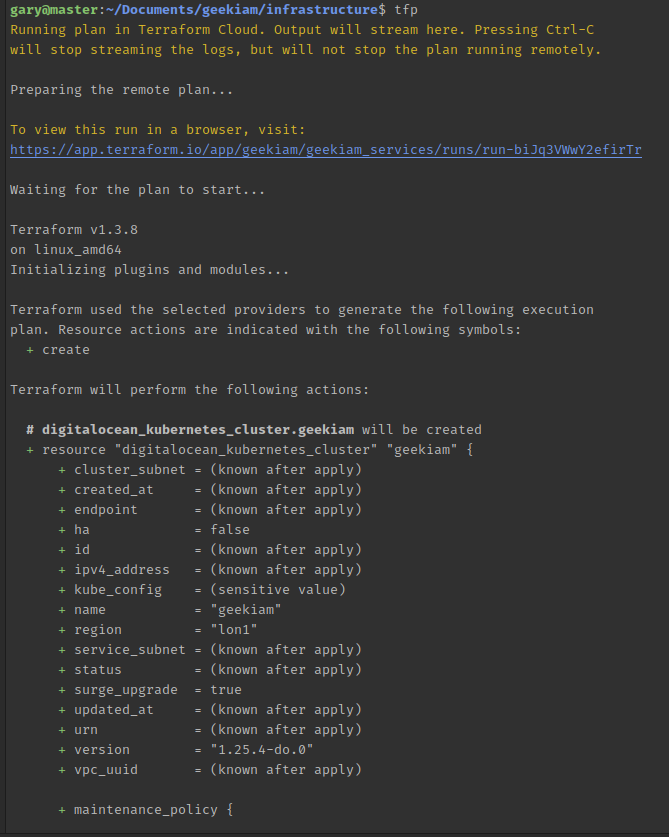
Plan the deployment
Our next step we can use the terraform plan command to create an execution plan, enabling you preview the changes that Terraform plans to make to your infrastructure. You can do this using the alias created
tfp
What this command does is:
- Reads the current state of any already-existing remote objects to make sure that the Terraform state is up-to-date.
- Compares the current configuration to the prior state and noting any differences.
- Proposes a set of change actions that should, if applied, make the remote objects match the configuration.
Deploy the Infrastructure
Once we are satisfied with the plan, we can then proceed to deploying our infrastructure, which effectively executes our desired configuration on Digital Ocean. We can do so by using the terraform apply command, which executes the actions proposed in a Terraform plan.
tfa
Once we execute the command, we will have to wait a few minutes for it to complete and our freshly created Kubernetes cluster will be available for us to use.
Conclusion
In this post we covered how to create a really simple Kubernetes cluster on Digital Ocean using terraform, which forms one of the building blocks of the final environment we are going to create in this series of blog posts on Digital Ocean, Terraform and Kubernetes.

- What is this Directory.Packages.props file all about? - January 25, 2024
- How to add Tailwind CSS to Blazor website - November 20, 2023
- How to deploy a Blazor site to Netlify - November 17, 2023