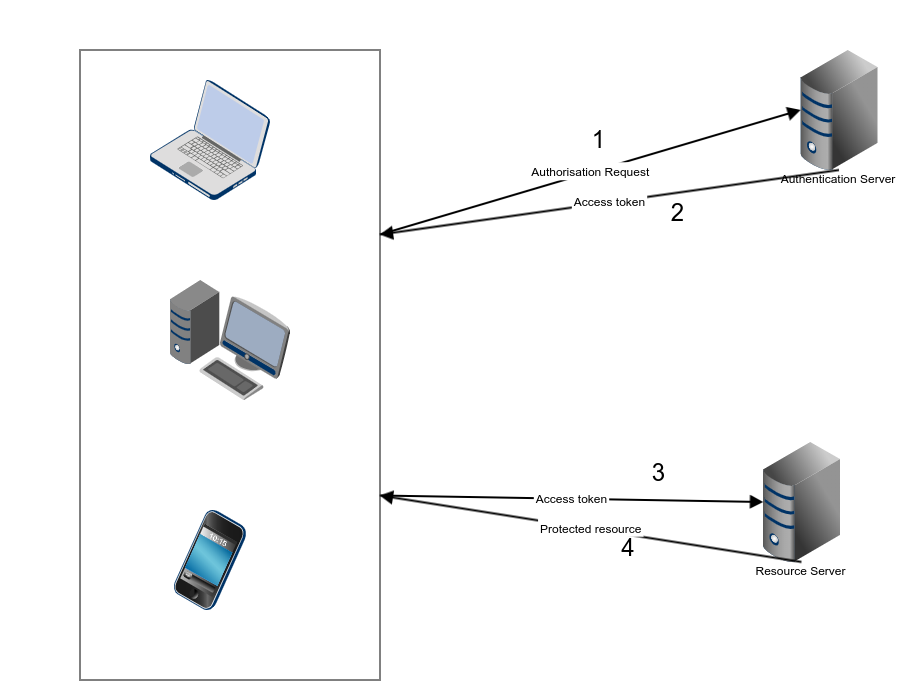
Authentication is one of the most important parts of any web application, particularly Web API projects. For decades, cookies and server-based authentication were the easiest solution. However, handling authentication in modern Mobile and Single Page Applications can be tricky, and demand a better approach.
The best-known solutions to authentication problems for APIs are the OAuth 2.0 and the JSON Web Token (JWT).
A JSON Web Token (JWT) is used to send information that can be verified and trusted by means of a digital signature. It comprises a compact and URL-safe JSON object, which is cryptographically signed to verify its authenticity, and which can also be encrypted if the payload contains sensitive information.
JWT authentication and authorization protocols use tokens as a method of carrying just enough data to either authorize a user to execute an action or request data from a resource.
Tokens can be thought of as packets of information that allow some authorization process to be carried out.
What is JWT Authentication
JWT is a compact token format intended for space constrained environments such as HTTP Authorization headers and URI query parameters.
JWTs encode claims to be transmitted as a JSON object that is base64url encoded and digitally signed and/or encrypted. Signing is accomplished using JSON Web Signature and encryption is accomplished using JSON Web Encryption (JWE).
I recommend checking out the original draft documentation to get a broader understanding.
Structure of JSON Web Token
A JWT is represented as a sequence of base64url encoded values that separated by period characters.
Header
The header contains the metadata for the token and it minimally contains the type of signature and the encryption algorithm.
This JWT example header declares that the encoded object is a JSON Web Token, and that it is signed using the HMAC SHA-256 algorithm.
Once this is base64 encoded, it will look similar to the below and forms the first part of our token string
Payload
A payload consists of claims which are nothing more than name-value pairs of attributes.
Generally speaking a claim is a statement about an entity, as well as additional metadata about the token itself.
The claim contains the information we want to transmit, and that the server can use to properly handle Web Token authentication.
There are multiple claims we can provide;
- Registered claim names
- Public claim names
- Private claim names.
The most common attributes that claims consist of have standard names which are called Registered Claim Names. These typically include:
- Issued At (iat) - Time token created
- Expires (exp) - token expiry time
- Issuer (iss) - Who issued the token
- Audience (aud) - Who is the token intended for
A sample payload may look something like this:
Once it is base64 encoded the payload may look something similar too
Signature
The JWT standard follows the JSON Web Signature (JWS) specification to generate the final signed token. It is generated by combining the encoded JWT Header and the encoded JWT
The signature secret key is held by the server so it will be able to verify existing tokens and sign new ones.
Typically a complete JWT will look something similar too
Why use JWT Token Authentication
Token-based authentication is stateless, so there is no need to store user information in the session. This provides the ability to scale an application without worrying where the user has logged in. We can easily use the same token for fetching a secure resource from a domain other than the one we are logged in to.
Advantages of Token-Based Authentication
- Stateless - The token contains all the information to identify the user, eliminating the need for session state.
- Reusability - A number of separate servers, running on multiple platforms and domains can reuse the same token for authenticating the user. It is easy to build an application that shares permissions with other applications.
- JWT Security - No cookies so no need to protect against cross-site request forgery attacks (CSRF).
- Performance - no server-side lookup to find and deserialize the session on each request, only need to calculate the HMAC SHA-256 to validate the token and parse its content.
Using JWT Authentication in . net Web Api
Dotnet Core has made it fairly trivial to implement JWT based authentication in
In this guide, I will walk through the process starting from generating a new Web API using the terminal commands then moving on to using
First, create your Web API using the terminal command. In my case I'll be creating a Document Management API, that essentially enables the processing and managing Document Metadata to provide it to a web application. The API will have several interaction end-points, i.e Interacting with a Python Based Artifical Intelligence & Machine Learning application, Laravel Web Application and Several AWS Lambdas and S3 Storage.
All these applications will be either post or get information from the API. We could obviously use a Service like OAuth or OKTA to handle all the security for us, but these services can get expensive pretty quickly and in this particular instance, the API is a fairly internally focused to primarily share information across several services and applications. Security is obviously always a key concern, but in this particular instance, we're mostly dealing with Anonymised data, which is also mainly machine generated and mostly contains Index information.
The API will also potentially be accessed several million times a day, therefore on service plans of most of the security vendors, our little start-up could become bankrupt pretty quick smart, so we will manage the risk and monitor.
Initially create the .net core web API project using the terminal command
This will create a basic stub of the Web API and we can now open it in the IDE or text editor of choice. Once you have the application open the Startup.cs
The first step
Before we continue with the code of our StartUp class. Let's create TokenManagement
We can now also edit appsettings.Development.json
We can now write the code to get our information from the App Settings and make use of it. We'll do this in the ConfigureServices method
If you debug the application now and set a breakpoint on the secret to ensuring you are able to retrieve the information. If this all works we should be pretty-good shape to continue.
We can now implement the authentication service and add it to our services collection. Implement the following code in your ConfigureServices method
All we now need to do is update Configure
What is CORS ?
A request for a resource i.e. Access to Web API, outside of the origin is known as a cross-origin request. CORS - cross-origin resource sharing manages cross-origin requests.
Allowing cross-origin requests is helpful, as many websites today load resources from different resources and services. Cross-origin requests, however, mean that servers must implement ways to handle requests from origins outside of their own. CORS allows servers to specify who (i.e., which origins) can access the assets on the server, among many other things.
Why is CORS Necessary ?
The CORS standard is needed because it allows servers to specify not just who can access its assets, but also how the assets can be accessed.
Cross-origin requests are made using the standard HTTP request methods. Most servers will GET
GETPUTPATCHDELETE
With CORS, a server can specify who can access and which HTTP request methods are allowed from external resources.
How does CORS Manage requests from External resources ?
An HTTP header is a piece of information associated with a request or a response. Headers are passed back and forth between your client and a server when client to wants to use resources hosted on a different server. Headers are used to describe requests and responses.
The CORS standard manages cross-origin requests by adding new HTTP headers to the standard list of headers. The following are the new HTTP headers added by the CORS standard:
Access-Control-Allow-OriginAccess-Control-Allow-CredentialsAccess-Control-Allow-HeadersAccess-Control-Allow-MethodsAccess-Control-Expose-HeadersAccess-Control-Max-AgeAccess-Control-Request-HeadersAccess-Control-Request-MethodOrigin
How to issue JWT Tokens using . net core
Now that we've configured our application to make use of JWT tokens, we're now ready to proceed setting up our application to issue tokens services that connect to it.
We'll develop a dedicated controller to handle the Authentication mechanism and issue the token. So lets add a new Controller and name is something original and descriptive like AuthenticationController
We will also create a simple POCO for our TokenRequest
At this
We have just enough code for our Authentication controller to work, but obviously
We can now create the class that implements the interface
All this magic in place we can now wire-up our dependency injection. So in Start.cs add the dependency injection to the
We can now inject our service into our controller.
Update the RequestToken method to implement our service
Our authentication service will need to connect to some data repository to verify and authenticate the user. We don't want to pollute our authentication service with any database connectivity logic, so we will make use of the Service layer pattern and dependency injection once more and inject a user management service which will have Database connectivity etc.
We'll create a simple interface for this logic.
We will go ahead and implement the interface creating a class. In this instance, I will simply return true for brevity.
The full implementation for the user management service is the subject for another blog post. Essentially we may use AWS AMI, Azure Identity or even role our own user authentication system. For the purpose of this post, we're just returning true, so we can move onto the next phase.
Avoid
Don't do this in PRODUCTION as essentially every authentication request will be validated to tru
Modify the StartUp.cs again to enable the Dependency Injection.
All the configuration and wiring up is now complete, we can now code our TokenAuthenticationService.
Quite a bit of code there but not all that difficult to understand - hopefully I have managed to pull all the complexity downwards - and easy to read.
Essentially what we do in the code, is
This signature ensures only a server possessing the key can decode and verify the contents of incoming tokens and grant or deny access to its resources.

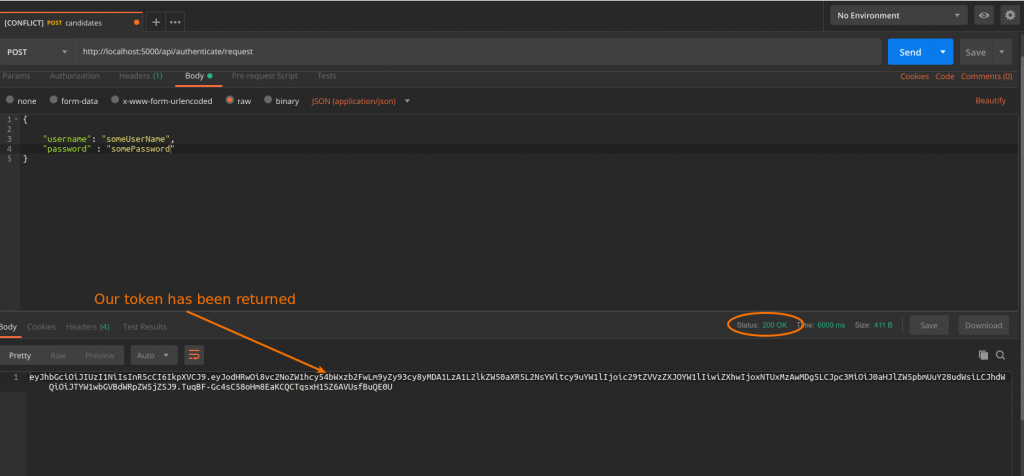
The basics of our JWT authorisation is now complete. We can now run the application and start Postman and quickly send in a request and check we get a Token back.

Summary
Token-based authentication enables us to construct decoupled systems that are not tied to a particular authentication scheme. The token might be generated anywhere and consumed on any system that uses the same secret key for signing the token.
JWT is mobile ready, and do not require the use of cookies.
There is still a lot to cover about JWTs, such with how to handle the security details, and refreshing tokens when they expire, but the JSON Web Token tutorial should demonstrate the basic usage and, more importantly, the advantages of using JWTs.
- What is this Directory.Packages.props file all about? - January 25, 2024
- How to add Tailwind CSS to Blazor website - November 20, 2023
- How to deploy a Blazor site to Netlify - November 17, 2023